
Bollard Outdoor Speaker Manual
Overview:
Install Guide:
Introduction
Thank you for purchasing the Bollard Speaker from our Seasons Landscape Collection™. At Origin Acoustics, we take pride in providing you with a high quality product. All of Origin Acoustics’ speakers are designed to have excellent sound quality, longevity, and a simple installation process.
These instructions covers the necessary information for a smooth installation, including: the tools you will need, step-by-step instructions for installation, troubleshooting tips for any errors that may occur, and all warranty information. If for any reason you experience problems or if you have installation questions please call us at (844) 674-4461. Hours of operation are 8:00am to 5:00pm (Pacific Time), Monday through Friday.

What's Included
Speaker
Wire Nuts (4)
Installation Manual
System Layout
Placement of the speakers throughout the home’s exterior will depend on a couple of factors. The first is how uniform of a sound field is required. The laws of physics dictate that the further the listener is from the sound source the lower the apparent sound pressure level or “volume.” Because of this there will always be areas with less sound and others with more. A greater number of speakers in the system will always make for more even coverage. The second factor is the desired maximum sound pressure required. Some systems are designed for background or ambient music only, while others are designed to rock the house or provide dance music. Again, the number of speakers will affect the maximum output. Consider creating different zones where louder music is required in one area and softer music in others.
The Bollard also has two dispersion options. One is omnidirectional allowing sound to projected 360 degrees from the enclosure. The second is accomplished with an insert to limit the sound to half if the dispersion or 180 degrees from the enclosure. This is perfect for border areas where you are concerned about unwanted sound spilling into a neighbor’s yard or an area where the music is simply unwanted. The Bollard must be ordered in one of the two configurations as the insert must be installed at the factory. Changing the insert in the field is not an option as doing so would likely damage the unit.
Installation
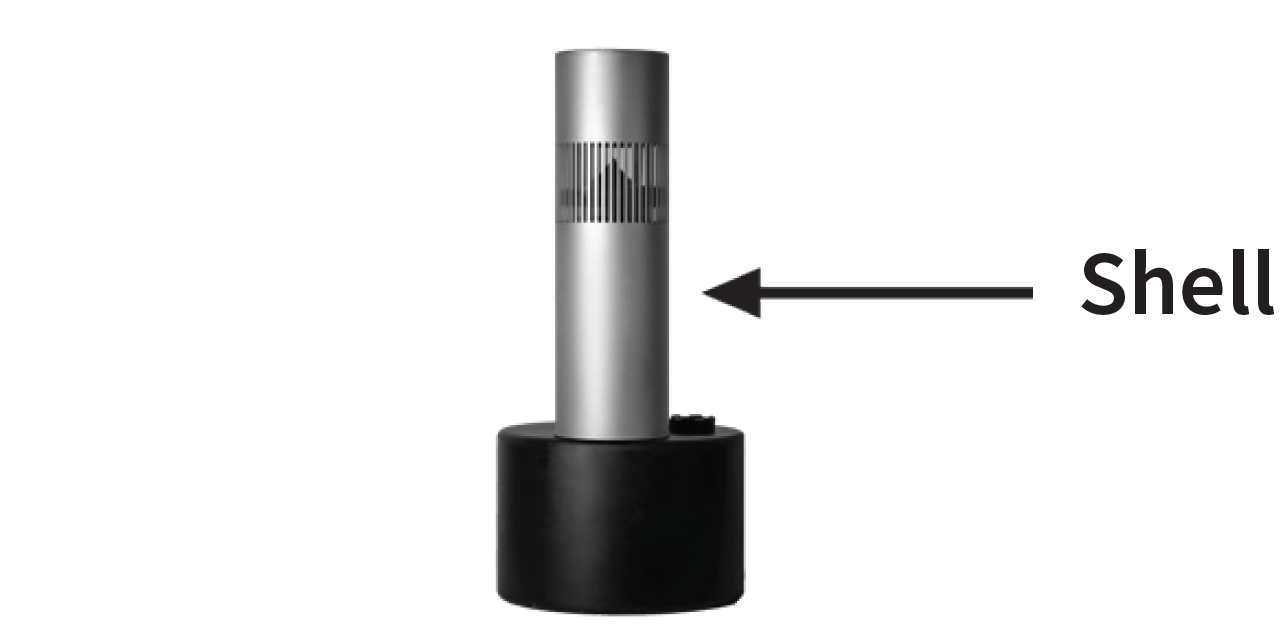
Once coverage and sound pressure requirements have been determined the Bollard locations can be selected. Before digging, confirm there are no subterranean obstructions such as water or gas lines, sprinkler pipes or electrical conduits. Holes for the subs should be deep enough to cover the entire lower section of the enclosure with approximately 1-inch of dirt on top of the that section. This will allow the pillar (shell) to protrude about 18-inches above the surface.
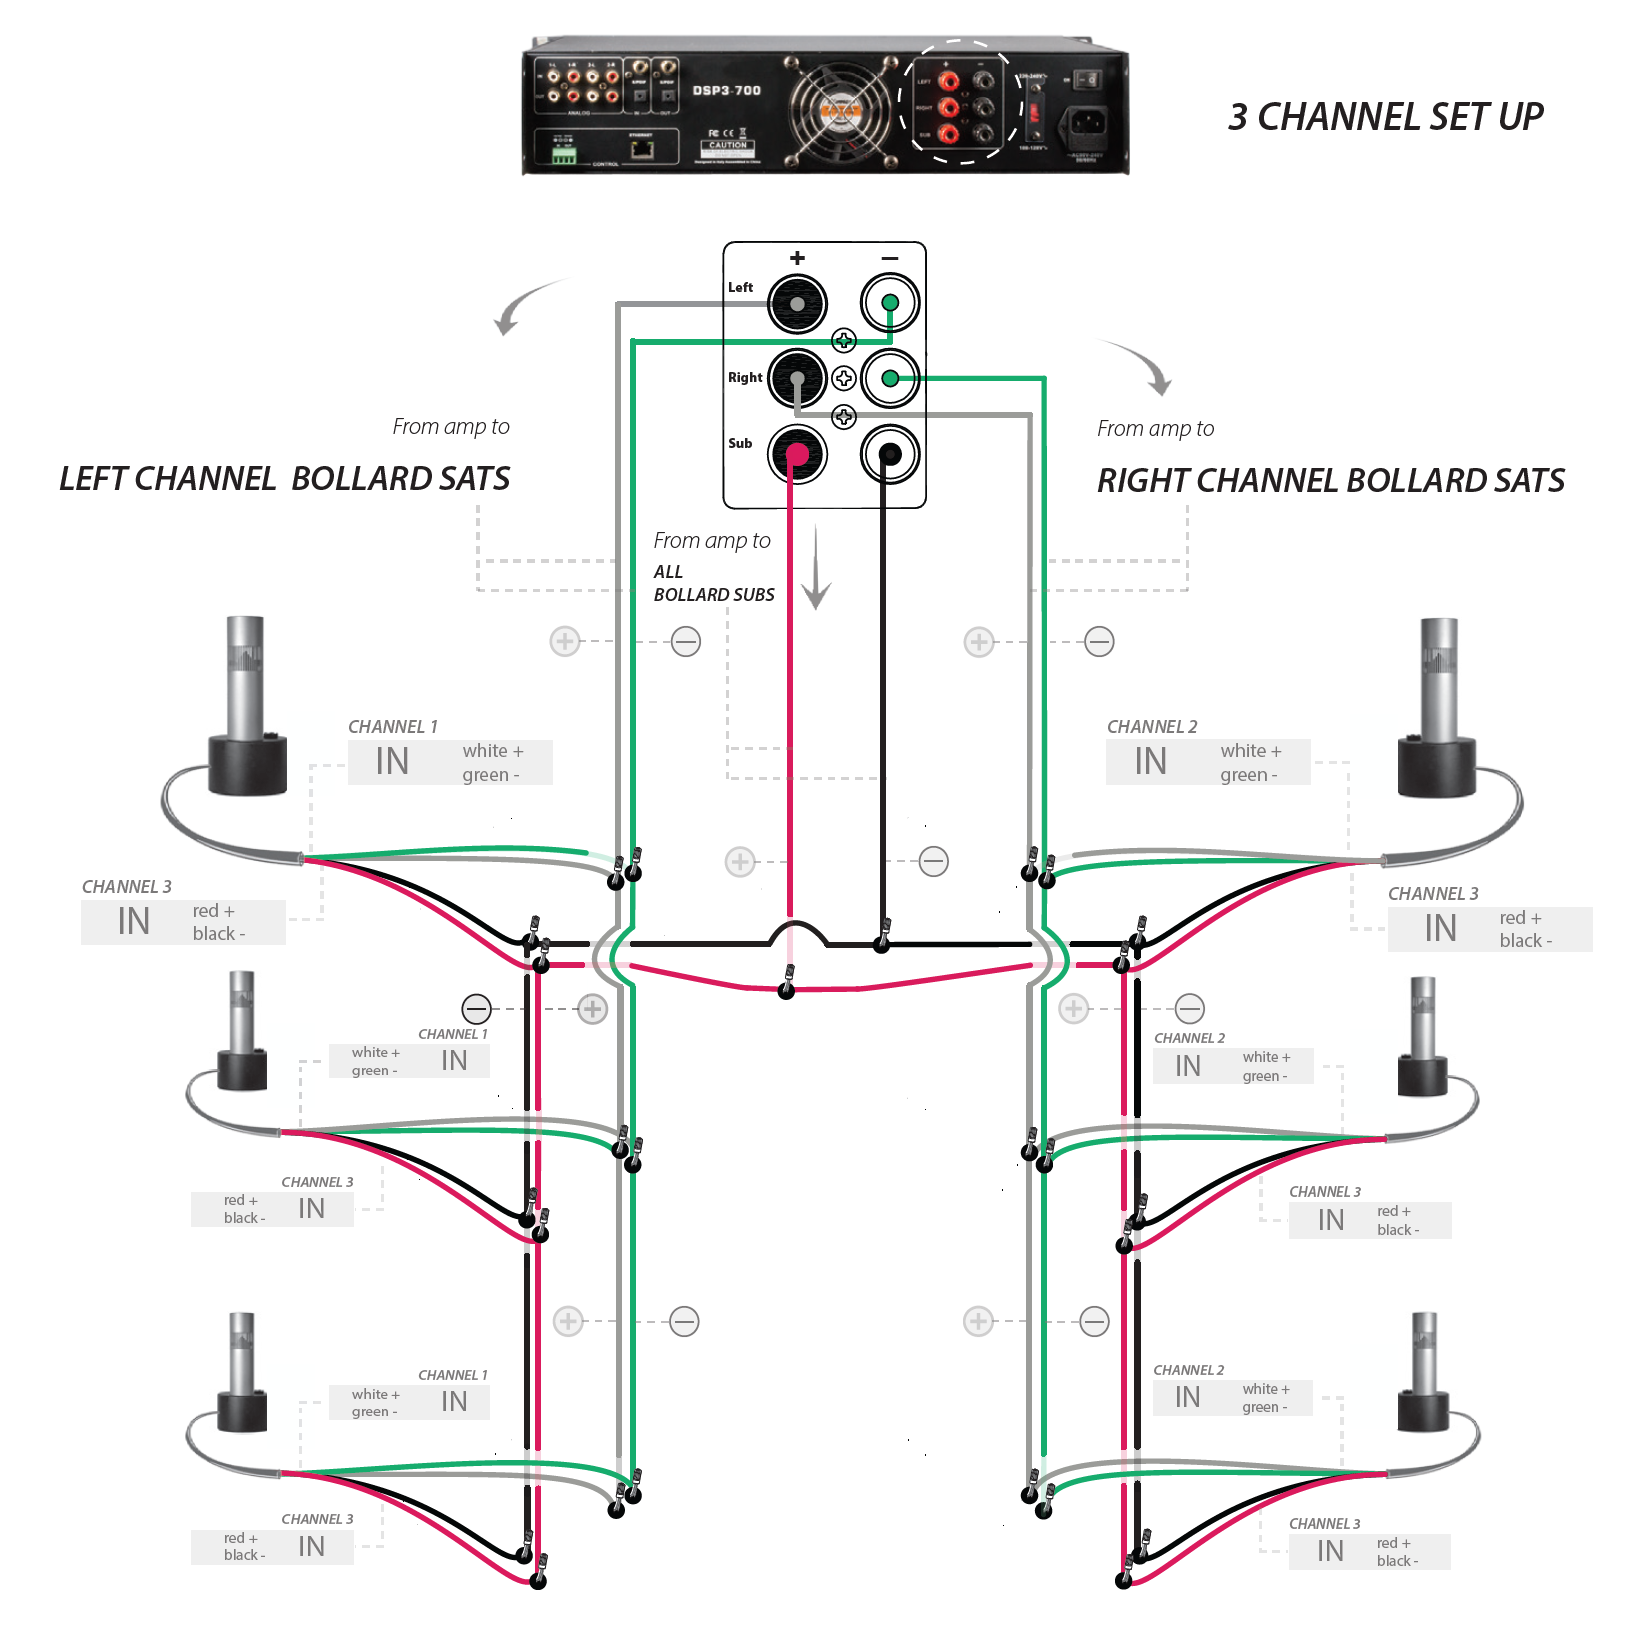
Consider whether you will be running the satellites in mono or stereo. In many applications the listener will never be equidistant from a left and right speaker, so mono may be the best option. Regardless, the DSP3-700 offers three independent channels so either option is viable. Remember, if you will be running in stereo you will need to run four wires to each speaker, (+) and (-) for left or right, and sub.
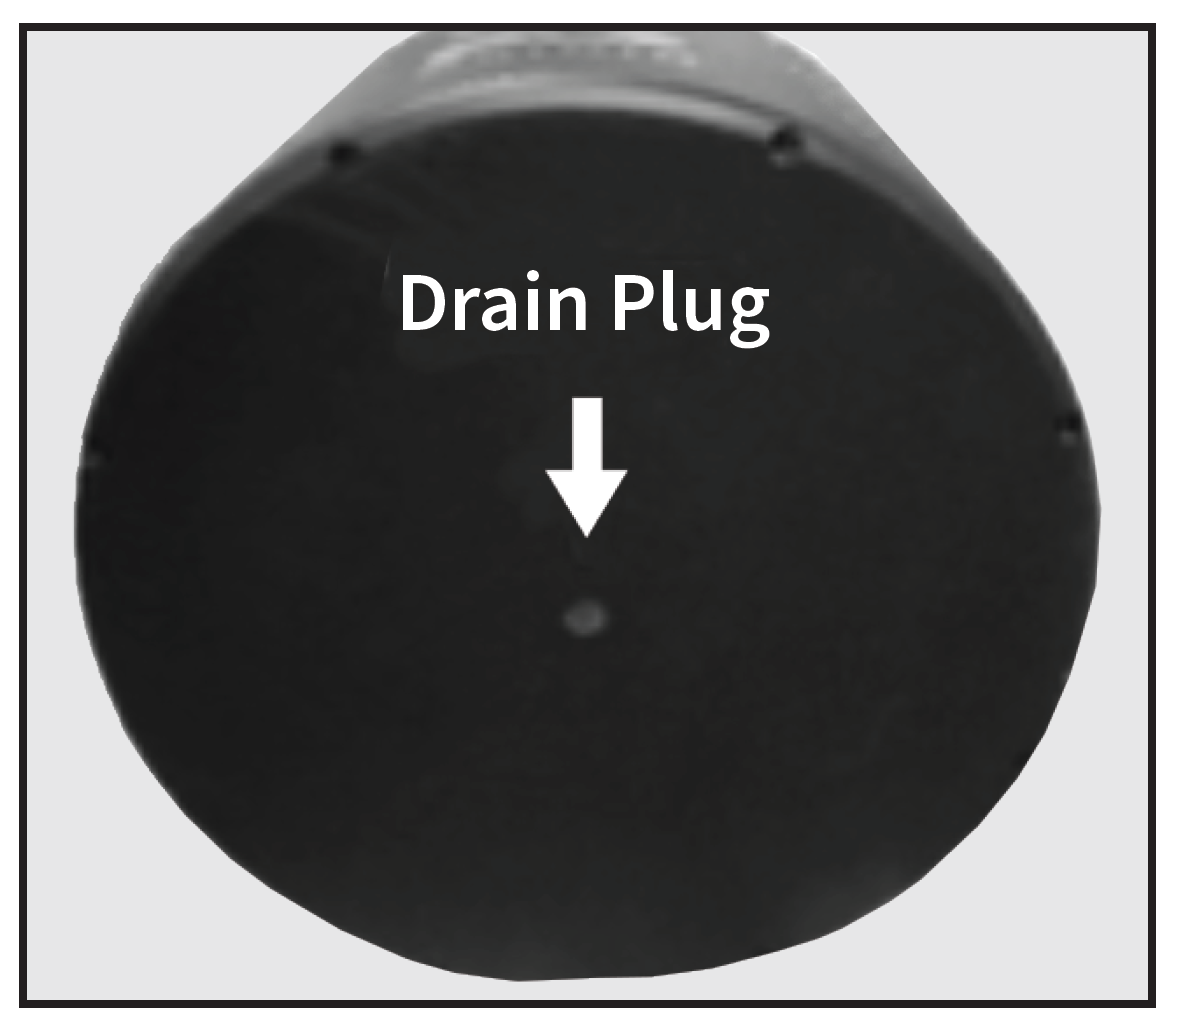
Drain Plug
The Bollard loudspeaker comes with a drain plug inserted at the bottom of its subwoofer enclosure. If there is water ingress for any unavoidable reason, removing the drain plug will allow for water to drain out. The drain plug is easily removable with a utility knife.
Option A – Drain plug remains in the sub enclosure
This option is recommended:
- In applications where ground water is at shallow depths and expected to rise easily above ground level or areas with overall very wet soil. E.g. Areas of Houston, Louisiana
Follow the below instructions:
- Dig a hole for the subwoofer, about 15” deep and 15” in diameter.
- Place the subwoofer as level as possible and not tilted.
- Take care to fill empty spaces around drain hole where water might accumulate.
- The subwoofer shouldn’t be in contact with large rocks or large empty holes below the drain hole.
- Use 2” of loose dirt to cover the top of subwoofer enclosure.
Option B – Remove the drain plug
This option is recommended:
- In applications with dry soil where occasional water may accidently enter the enclosure. Use of gravel and sand will allow any water that gets into the sub enclosure to properly escape. E.g. Las Vegas, Inland Southern California, Southwest desert
Follow the below instructions:
- Dig a hole for the subwoofer, about 18” deep and 18” in diameter.
- Lay gravel rock (3/8” size recommended) for a depth of min. 3” below the bottom of subwoofer enclosure.
- Place the subwoofer as level as possible and not tilted.
- Take care to not block the drain hole by direct contact with gravel rock.
- Use 2” of loose dirt to cover the top of subwoofer enclosure.
Burial Depth
The subwoofer enclosure should be buried to a level where the dirt covers the wire nut and protruding wire at the top of enclosure. Do not bury excessively deep. Care should be taken to ensure that all Bollards extend to the same height above ground.
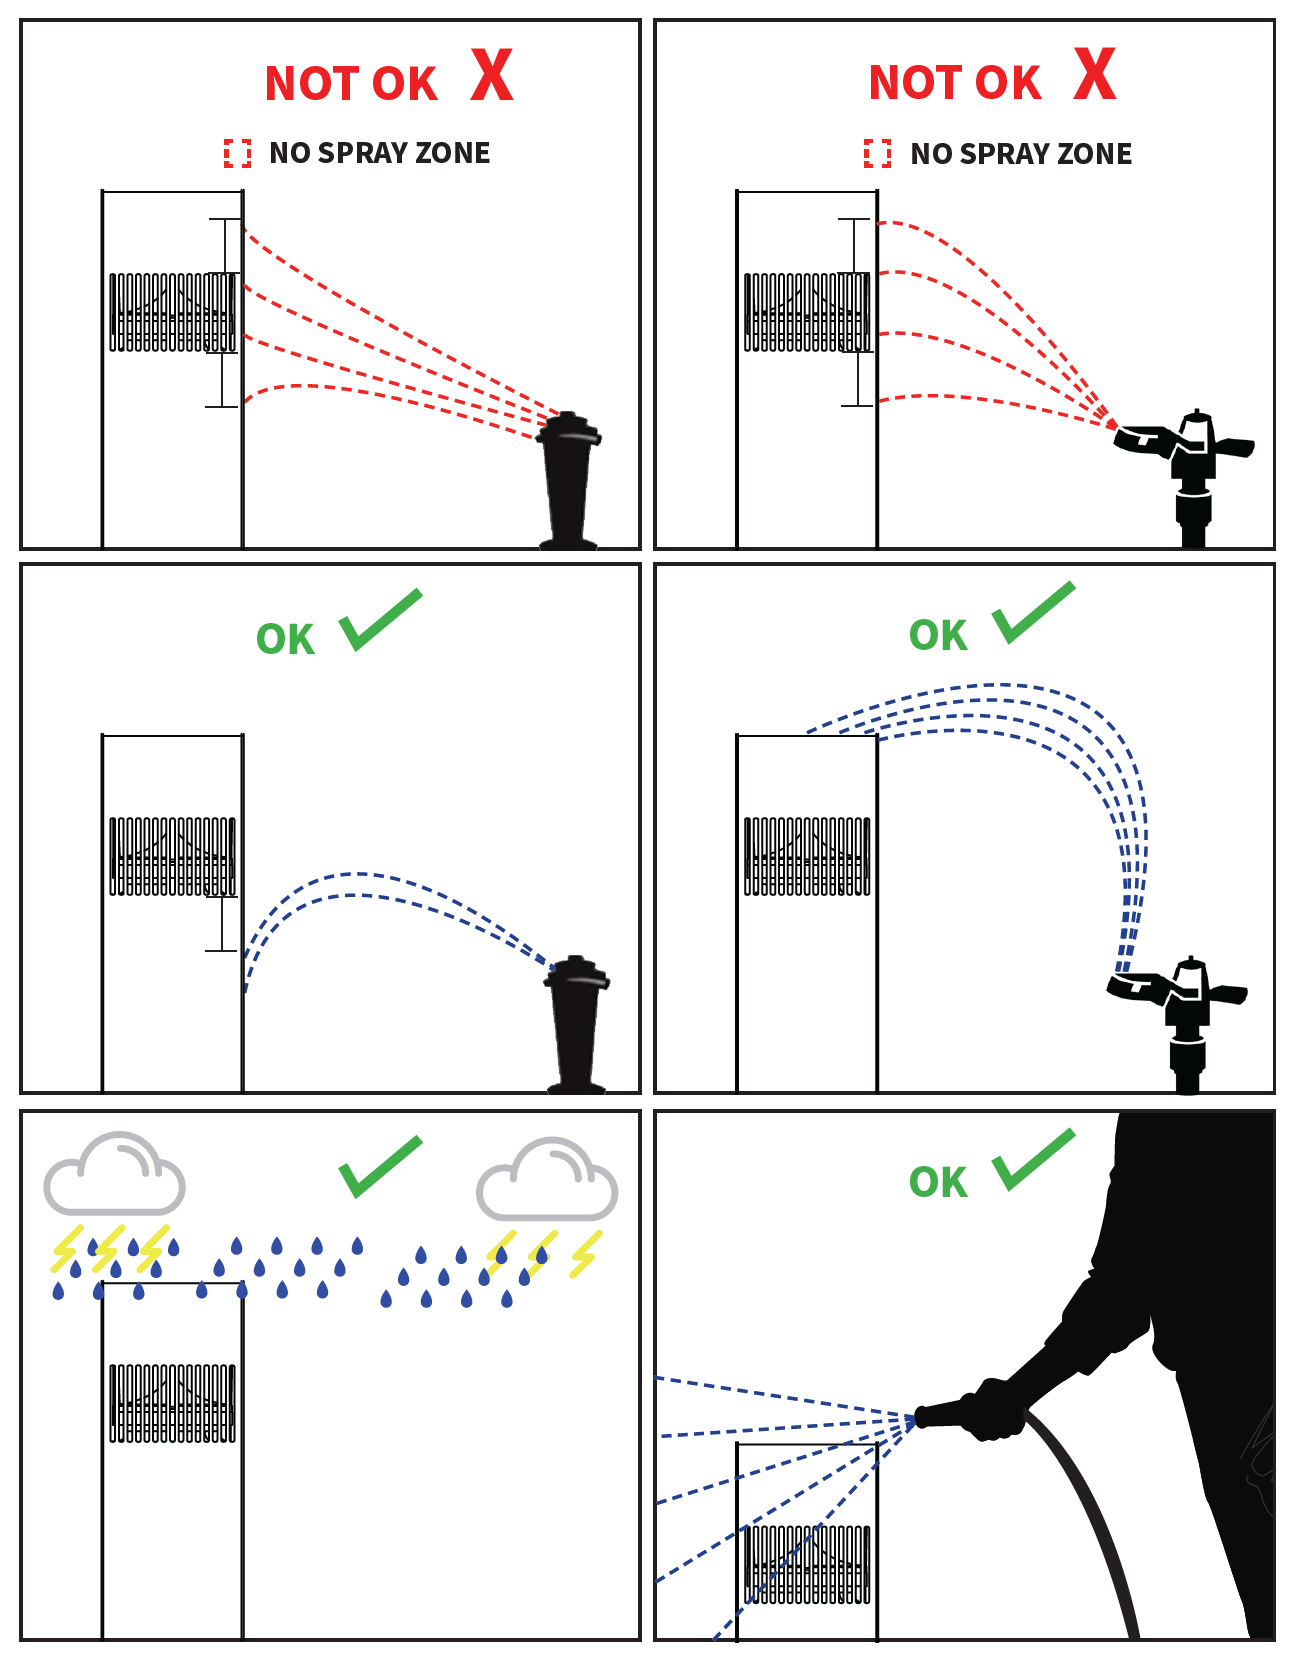
NOTE: DO NOT BURY THE ENCLOSURE UNTIL ALL WIRING HAS BEEN COMPLETED.Bollard Installation & Sprinkler Location
It is highly recommended that the Bollard speaker be installed at a location such that the water sprinkler nearby (if any) does not spray the water jet into or +/- 2 inches from vertical slots of the Bollard shell. See ilustration below:
NOTE: DO NOT BURY THE ENCLOSURE UNTIL ALL WIRING HAS BEEN COMPLETED. All Subwoofer portion of Bollards will be on a designated wire run and all Satellite portion of Bollards on a separate wire run. The DSP3-700 amplifier from Origin Acoustics was specifically designed to drive Origin’s outdoor speaker systems. It is not required, and you can select the amplifier of your choice, but the DSP3-700 offers EQ and crossover presets specifically for the Bollard. These presets have active crossovers that remove the bass from the satellites and send that bass only to the subwoofers. This more effectively controls how the subwoofer interfaces with the satellites and permits you to control the subwoofer-to-satellite balance. The digital signal processing or “DSP” also shapes the sound for both subs and satellites to create optimum performance.
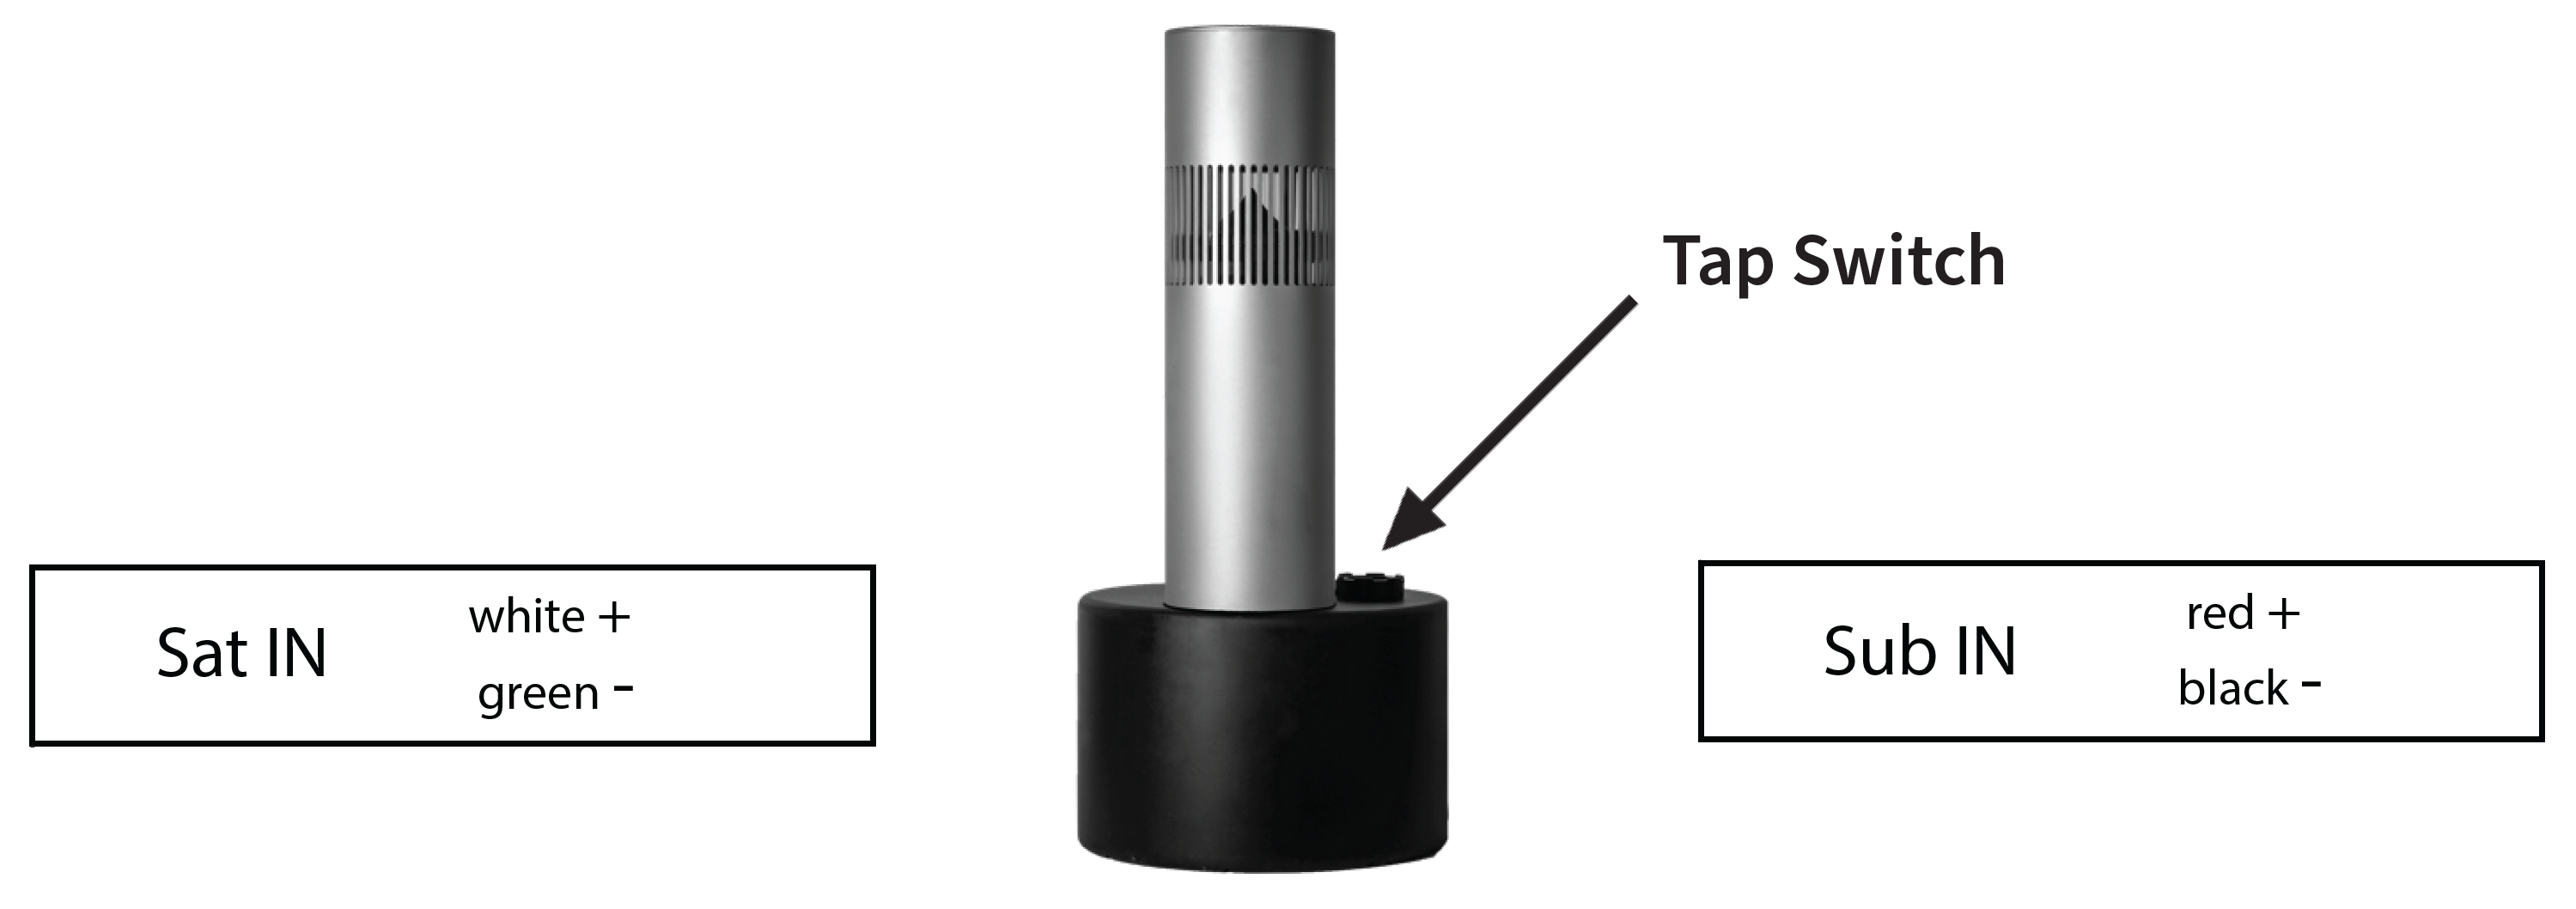
Tap Settings
Each pair of wires connecting into the subwoofer and satellite portions of Bollard speaker is labeled as SUB IN and SAT IN respectively.
To change the power tap setting, use the tap switch under the cap on the subwoofer.
8 Ω vs 70V Wiring Options
If you are looking to use more than 2 Bollard speakers, 70V is the proper solution.
RECOMMENDED AMP FOR 70V SYSTEM:
- 1 x DSP3-700 Amp
RECOMMENDED AMPS FOR 8 Ω SYSTEM:
- OPTION A: 1 x DSP3-150 Amp
- OPTION B: 2 x DSP2-200 Amp ( Bollard Version)
In the Ohm (Ω) tap switch position, the transformers are bypassed. Due to the impedance in the 6
Ω (Sub) / 4 Ω (Sat) setting, only a single pair of Bollards can be used.
BOLLARD TAP SWITCH SETTINGS AMPLIFIER
RECOMMENDEDNUMBER OF BOLLARD SPEAKERS
50W (70V) 1 x DSP3-700 Total 12 per DSP3-700 Amp (6/Channel)
25W (70V) 1 x DSP3-700 Total 24 per DSP3-700 Amp (12 per Channel)
8Ω (bypass) 1 x DSP3-150* Total 2 per DSP3-150
Amp*
8Ω (bypass) 1 x DSP2-200* Total 2 per PAIR of DSP2-200 Amp*
70V Wiring Setup
Use 1 separate wire run for:
- Subwoofer portions of Bollards
Use another separate wire run for:
- Satellite portions of Bollards
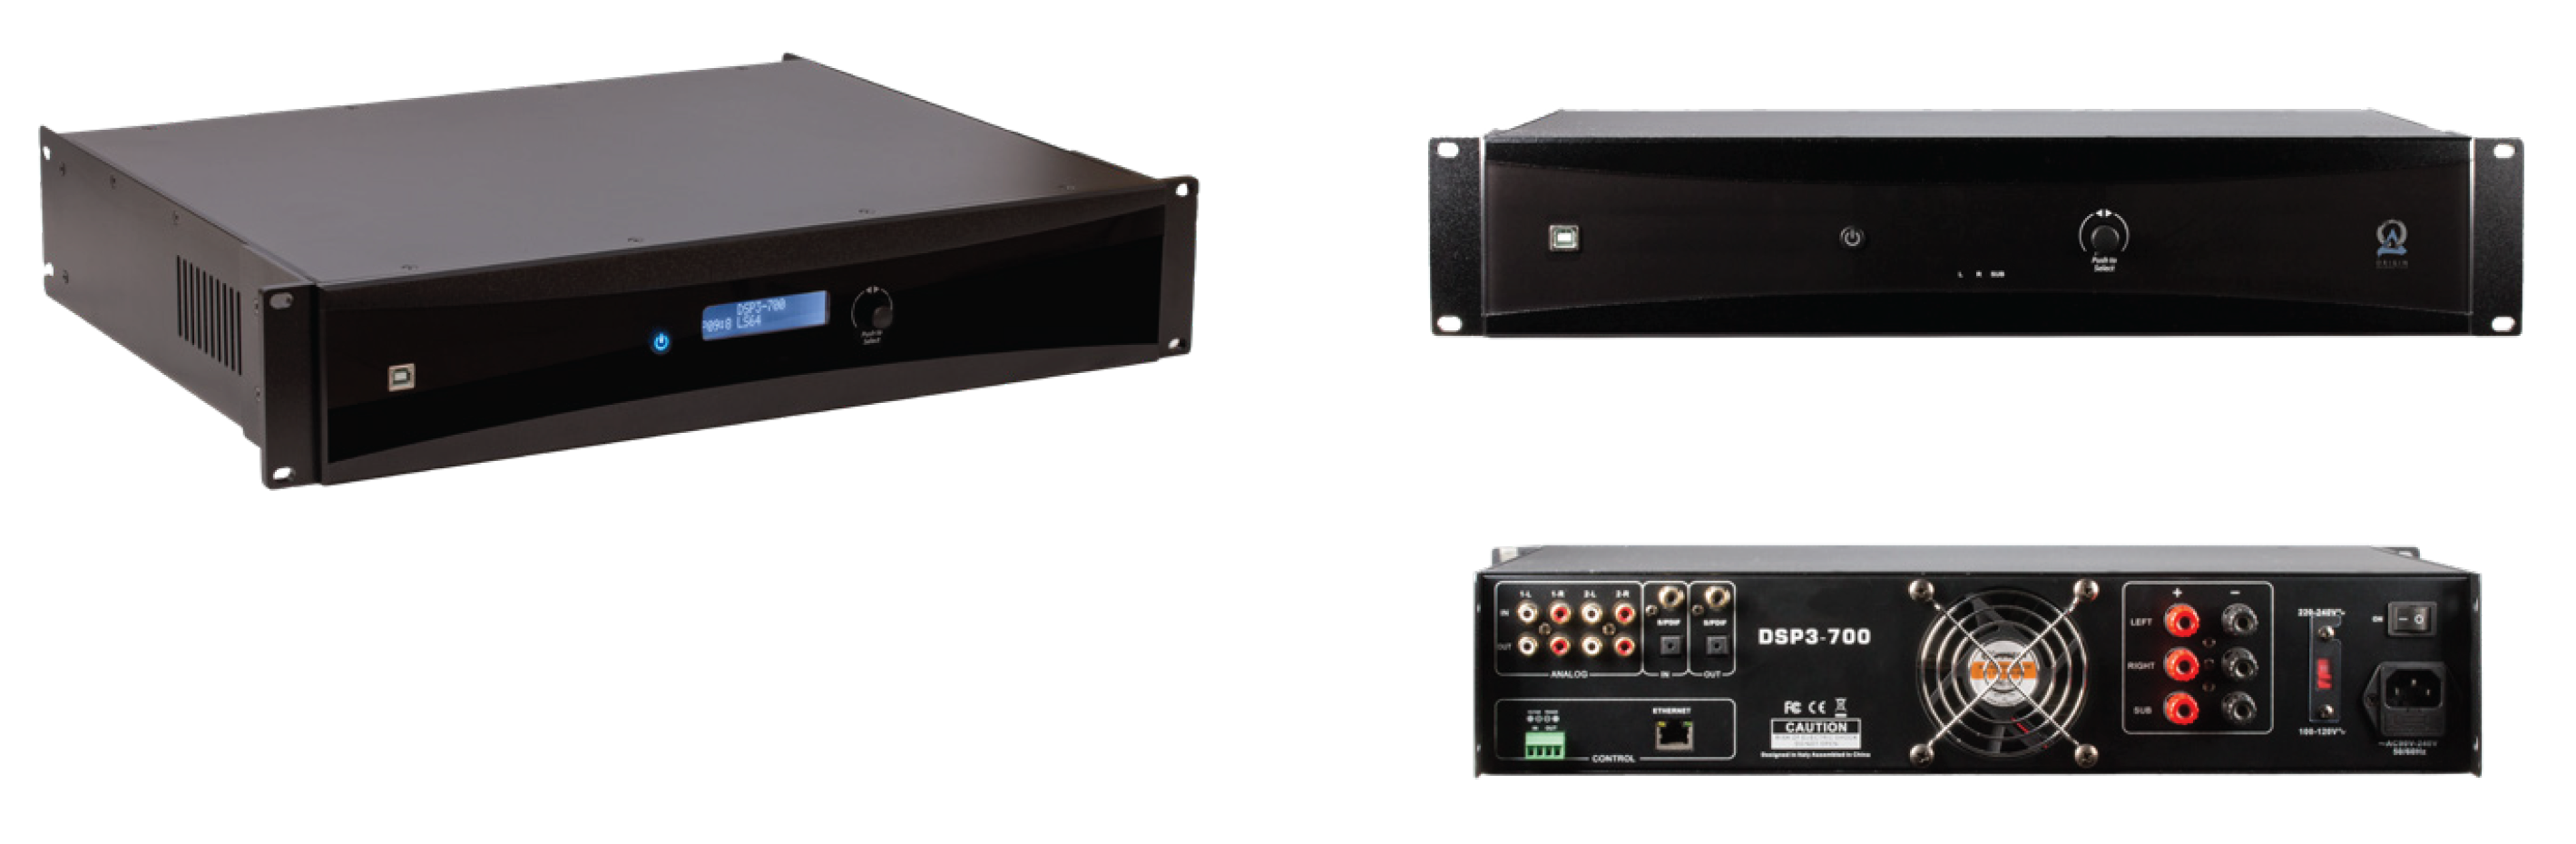
The DSP3-700 amplifier from Origin Acoustics was specifically designed to drive Origin’s outdoor speaker systems. In 70V, t is the recommended amp for Sub control and DSP for best performance. It is not required, and you can select the amplifier of your choice, but the DSP3-700 offers EQ and crossover presets specifically for the Bollard. These presets have active crossovers that remove the bass from the satellites and send that bass only to the subwoofers. This more effectively controls how the subwoofer interfaces with the satellites and permits you to control the subwoofer-to-satellite balance. The digital signal processing or “DSP” also shapes the sound for both subs and satellites to create optimum performance.
70V INSTALLATION NOTES:
- Subwoofer portions of Bollards
This means the positive connection on the amplifier will be connected to the positive connection on speaker 1, 2, 3, etc. The negative connection will be connected to the negative connections on the speakers as well. This can be accomplished with a single pair of wires in a “daisy chain” where the amplifier is at one end and the speakers are connected consecutively.
If desired, you can also wire in a star pattern where each speaker is directly wired back to the amplifier.
LSB64 BOLLARDS WIRING WITH DSP3-700 AMP
MAXIMUM NUMBER OF BOLLARDS PER DSP3-700 AMP: 24 BOLLARDS (25W TAP SETTING)
- Consider whether you will be running the satellites in mono or stereo.
In many applications the listener will never be equidistant from a left and right speaker, so mono maybe the best option. Regardless, the DSP3-700 offers three independent channels so either option is viable. Remember, if you will be running in stereo you will need to run four wires to each speaker, (+) and (-) for left or right, and sub.
8Ω Wiring Setup
NOTE: This configuration is run IN-SERIES.
LSB64 BOLLARDS WIRING WITH DSP3-150 AMP

MAXIMUM NUMBER OF BOLLARDS PER DSP3-150 AMP: 2
* WARNING: Run maximum of 2 Bollard speakers ONLY per amplifier in 8Ω Tap switch setting.
Painting
The shell (pillar) of the Bollard outdoor speaker is anodized specifically for achieving maximum durability of the pillar color. If you wish to change the color of the Bollard shell by painting or other process, it may compromise the durability and finish of the product compared to the original manufacturing process and modify the specifications.
Troubleshooting
If you have a problem, try isolating it first. For example, if you’re playing a DVD and there is no sound, try replacing the DVD with an MP3 player to see if you get sound. If it does work, then the problem is with the television, DVD player, or the cables connecting them. If it doesn’t work, the problem will be with the amplifier, speakers, or those cables.
Common Solutions
| PROBLEM | POSSIBLE CAUSES |
|---|---|
| NO SOUND | The volume may be turned down or muted. Check the volume settings volume may be turned down or muted. Check the volume settings on both the amplifier and the DVD player/ television/ computer/ etc. |
| NO SOUND | Make sure the proper source is selected on the amplifier or receiver. |
| NO SOUND | Check the cord connecting the amplifier with the source. The cord may be damaged or plugged into the wrong input or output. |
| NO SOUND | Check the wires connecting the amplifier with the speakers. Make sure they’re connected properly and not damaged in any way. |
| POOR SOUND QUALITY | If you hear something like static, or the sound is cutting in and out, check the audio cables. If the problem increases when a cable is being moved, then the cable is most likely faulty or not connected properly. |
| POOR SOUND QUALITY | Today’s audio systems may have several places to adjust the volume, for example your MP3 player may have a volume control, and your amplifier may also have one. Check to be certain that the volume isn’t turned up past 80% on any device. |
| POOR SOUND QUALITY | Try changing sources to be certain that the selection you’ve chosen is a good quality recording. |
LSB64 Bollards Retrofit Wiring Situation With DSP3-150 AMP
The recommended setup is a 3-Channel setup, as seen on page 12.
This 2-Channel set up below is ONLY recommended for:
- Retrofit Situations
- When no more than four conductors are available, where a maximum of 2 channels can be used.
NOTE: This configuration is run IN-SERIES.

*WARNING: Run maximum 2 (TWO) Bollard speakers ONLY per Amplifier if used in 8ohm Tap switch setting.
Technical Assistance
If you have any questions or concerns about installing or using this product, you can reach us through one of the following methods:
Phone: (844) 674-4461
Hours of operation: 8:00am – 5:00pm (Pacific Time), Mon – Fri
Email: sales@originacoustics.com
If you are having technical trouble, please include the model number and briefly explain what steps you took to resolve the problem in your email, or be prepared to answer these questions over the phone. If you are considering returning the product, it’s required that you contact Origin Acoustics prior to any return attempts. This way we can determine if the issue can be resolved without returning the product, or if needed we can provide instructions and support for the return process.
Limited 5-Year Warranty
Origin Acoustics warrants to the original retail purchaser only that this Origin Acoustics product will be free from defects in materials and workmanship, provided the speaker was purchased from an Origin Acoustics authorized dealer.
If the product is determined to be defective, it will be repaired or replaced at Origin Acoustics’ discretion. If the product must be replaced yet it is no longer manufactured, it will be replaced with a model of equal to or greater value that is the most similar to the original. If this is the case, installing the replacement model may require mounting modifications; Origin Acoustics will not be responsible for any such related costs.
Requirements & Coverage
This warranty may not be valid if the product was purchased through an unauthorized dealer. This warranty only applies to the individual that made the original purchase, and it cannot be applied to other purchases. The purchaser must be prepared to provide proof of purchase (receipt). This warranty will not be valid if the identifying number or serial number has been removed, defaced, or altered.
Not Covered by Warranty
- Accidental damage
- Damage caused by abuse or misuse
- Damage caused by attempted repairs/modifications by anyone other than Origin Acoustics or an authorized dealer
- Damage caused by improper installation
- Normal wear, maintenance, and environmental issues
- Damage caused by voltage inputs in excess of the rated maximum of the unit
- Damage inflicted during the return shipment
Return Process
Before making any return attempts, it is required that you first contact Origin Acoustics. Return product to Origin Acoustics or your dealer, either in person or by mail. It’s preferable if the product is returned in the original packaging. If this isn’t possible, the customer is responsible for insuring the shipment for the full value of the product.
This warranty is in lieu of all other expressed or implied warranties. Some states do not allow limitations on implied warranties, so this may not apply depending on the customer’s location. (For more information, see Magnuson-Moss Warranty Act.)
| LSB64 | |
| Woofer: | 6 1/2” Poly Woofer |
| Mid-Range: | 4 1/2” Aluminum |
| Tweeter: | 1” PEI |
| Power RMS: | 60W |
| Power Peak: | 100W |
| Response: | 48Hz-20kHz |
| Sub Impedance: | 6 ohm |
| Sat Impedance: | 4 ohm |
| Sub Diameter: | 12 1/2” (315mm) |
| Sleeve Diameter (RD): | 5 1/2” (140mm) |
| Sleeve Diameter (SQ): | 5 3/4” x 5 3/4” (140mm x 140mm) |
| Sleeve Height: | 18 3/4” (476mm) |
| Transformer Taps: | 70V-50W/25W) |
| Sub Enclosure Height: | 8 1/2” (212mm) |