SiteOne Kit 3 & 4 Installation Manual
Overview:
Install Guide:
Introduction
Thank you for buying Ambisonic Landscape Loudspeaker system. These systems were designed and tuned by the same engineers who invented multiple speaker satellite/subwoofer outdoor sound systems. They’re built to install easily and quickly, and to sound fantastic day in and day out for years to come.
This instruction booklet cover the necessary information for a smooth installation, including: the tools you will need, step-by-step instructions for installation, troubleshooting tips for any errors that may occur, and all warranty information. If for any reason you experience problems or if you have installation questions please call us at (844) 674-4461. Hours of operation are 8:00am to 5:00pm (Pacific Time), Monday through Friday.
Important Safety Instructions
• Read these instructions.
• Keep these instructions.
• Heed all warnings.
• Follow all instructions.
• Do not use this apparatus near water.
• Clean only with dry cloth.
• Do not block any ventilation openings. Install in accordance with the manufacturer’s instructions.
• Do not install near any heat sources such as radiators, heat registers, stoves, or other apparatus (including amplifiers) that produce heat.
• Do not defeat the safety purpose of the polarized or grounding-type plug. A polarized plug has two blades with one wider than the other. A grounding-type plug has two blades and a third grounding prong. The wide-bladed or the third prong is provided for your safety. If the provided plug does not fit into your outlet, consult an electrician for the replacement of the obsolete outlet.
• Protect the power cord from being walked on or pinched particularly at plugs, convenience receptacles, and the point where they exit from the apparatus.
• Only use attachments/accessories specified by the manufacturer.
• Use only with the cart, stand, tripod, bracket, or table specified by the manufacturer, or sold with the apparatus. When a cart is used, use caution when moving the cart/apparatus combination to avoid injury from tip-over
• Unplug this apparatus during lightning storms or when unused for long periods of time.
• Refer all servicing to qualified service personnel. Servicing is required when the apparatus has been damaged in any way, such as powersupply cord or plug is damaged, liquid has been spilled or objects have fallen into the apparatus, the apparatus has been exposed to rain or moisture, does not operate normally, or has been dropped.
• To help maintain ambient temperature, DO NOT mount in locations with direct sunlight.
• To reduce the risk of electrical shock, do not open the equipment. For safety reasons it is only allow to the opened by qualified service personnel.
• WARNING: To reduce the risk of fire or electric shock, do not expose this apparatus to rain or moisture. Additionally, the apparatus shall not be exposed to dripping or splashing and no objects filled with liquids shall be placed on the apparatus.
• The mains plug is used as the disconnect device and shall remain readily operable.
• The product shall be used on open bench.
• No naked flame sources, such as lighted candles, should be placed on the apparatus.
• The apparatus should be connected to a mains socket outlet with a protective earthing connection.
• Ventilation should not be impeded by covering the ventilation openings with items, such as newspapers, table-cloths, curtains, etc.
• This apparatus is suitable for use in tropical climates.

Caution:
TO REDUCE THE RISK OF ELECTRIC SHOCK, DO NOT REMOVE COVER OR BACK. NO USER-SERVICEABLE PARTS INSIDE. REFER SERVICING TO AUTHORIZED SERVICE PERSONNEL.
Warning:
TO PREVENT FIRE OR SHOCK HAZARD, DO NOT EXPOSE THIS APPLIANCE TO RAIN OR MOISTURE. THE APPLIANCE SHALL NOT BE EXPOSED TO DRIPPING OR SPLASHING. NO OBJECTS FILLED WITH LIQUIDS SHALL BE PLACED ON THE APPLIANCE.
Limited Lifetime Warranty
Ambisonic warrants to the original retail purchaser only that this Ambisonic product will be free from defects in materials and workmanship, provided the speaker was purchased from an Ambisonic authorized dealer. If the product is determined to be defective, it will be repaired or replaced at Ambisonic’s discretion. If the product must be replaced yet it is no longer manufactured, it will be replaced with a model of equal to or greater value that is the most similar to the original. If this is the case, installing the replacement model may require mounting modifications; Ambisonic will not be responsible for any such related costs.
-
3 YEAR LIMITED WARRANTY – L300 AMPLIFIER & S11BP-IG
-
5 YEAR LIMITED WARRANTY – LS64 SATELLITE
This warranty may not be valid if the product was purchased through an unauthorized dealer. This warranty only applies to the individual that made the original purchase, and it cannot be applied to other purchases.
The purchaser must be prepared to provide proof of purchase (receipt). This warranty will not be valid if the identifying number or serial number has been removed, defaced, or altered.
Warranty Requirements & Warranty Coverage:
All warranties and warranty conditions are subject to change. Please refer to www.ambisonicsystems.com for the latest information.
These conditions are not covered by warranty:
• Accidental damage
• Damage caused by abuse or misuse
• Damage caused by attempted repairs/modifications by anyone other than Ambisonic or an authorized dealer
• Damage caused by improper installation
• Normal wear, maintenance, and environmental issues
• Damage caused by voltage inputs in excess of the rated maximum of the unit
• Damage inflicted during the return shipment
Tools Required
-
Speaker Wire (Burial Grade)
-
Wire Stripper
-
Precision Screwdriver
-
Shovel
-
Trenching Shovel (Optional)
-
Rubber Mallet (Optional)
Speaker Cable Choice
Be sure to use burial-grade speaker cable for any cables that will be buried underground.
If the cables will be run through walls (such as running from the speaker system to an amplifier installed indoors), make sure your cables are CL3-rated for in-wall use.
To ensure the best performance from the speakers, use stranded speaker wire of the appropriate gauge for the length of the wire run.
| Wire Length | Wire Gauge |
| 0 -100’ (0 – 30m) | 16 |
| 50 – 150’ (15 – 45m) | 14 |
| Over 100’ (30m) | 12 |
What’s Included
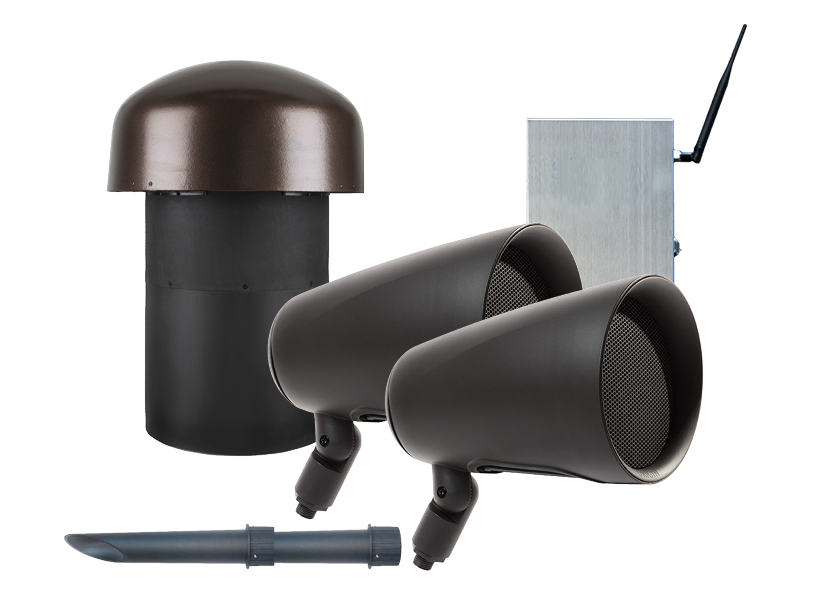
LS KIT 3:
-
1 x L-300 Amplifier
-
1 x S11BP-IG Burial Subwoofer
-
2 x LS64 Landscape Speakers
-
2 x LSLS Stakes
-
2 x Resistors
LS KIT 4:
-
2 x L-300 Amplifier
-
1 x S11BP-IG Burial Subwoofer
-
4 x LS64 Landscape Speakers
-
4 x LSLS Stakes
L-300 Amplifier Features (Without Streamer)
| 1. Bluetooth Antenna (1) 2. Bluetooth Switch 3. Bridge (70V) or Stereo Switch 4. Low Pass Filter (LPF) Switch 5. Gain Knob 6. Clipping/BT Indicator Lights 7. Speaker Output: Right 8. Speaker Output: Left 9. 120V AC Input 10. Fan 11. Bridge (70V) Speaker Output L+ & R- |
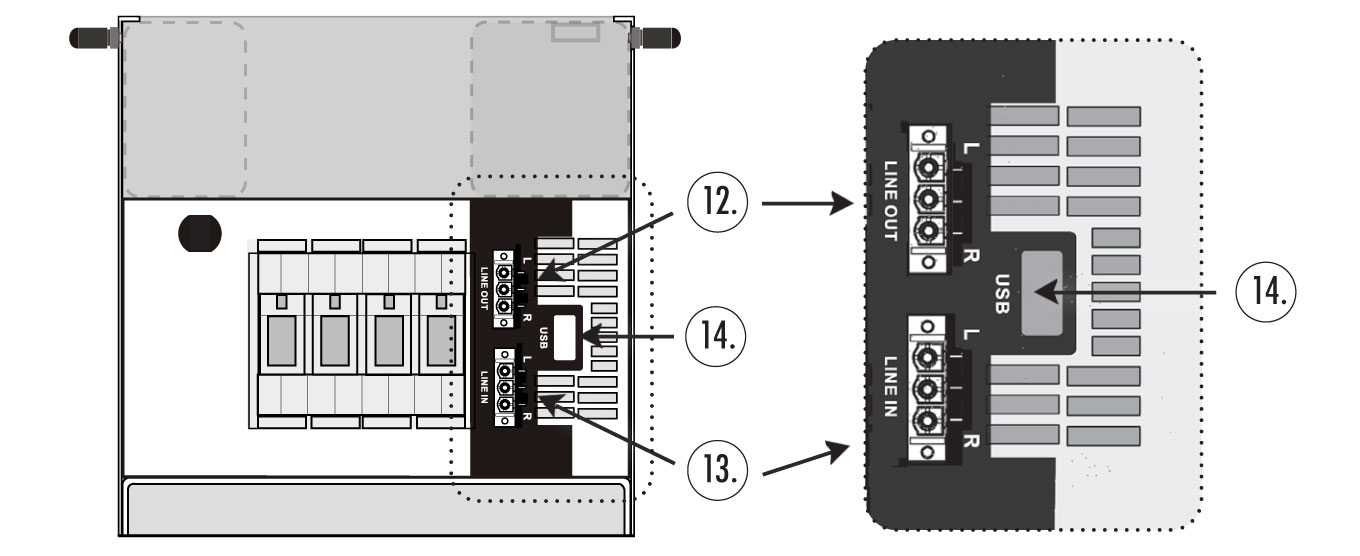
12. Line OUT Phoenix Connection 13. Line IN Phoenix Connection 14. USB 5V Power Port 15. – 16. – 17. Speaker Wire Strain Reliefs (2) 18. Weather Resistant Enclosure 19. Mounting Tab 20. Bottom Panel Access Door: (For easier access, loosen the 2 forward screws on each side & then pull panel downward) |
1. Bluetooth Antenna (1)
2. Bluetooth Switch
3. Bridge (70V) or Stereo Switch
4. Low Pass Filter (LPF) Switch
5. Gain Knob
6. Clipping/BT Indicator Lights
7. Speaker Output: Right
8. Speaker Output: Left
9. 120V AC Input
10. Fan
11. Bridge (70V) Speaker Output L+ & R-
12. Line OUT Phoenix Connection
13. Line IN Phoenix Connection
14. USB 5V Power Port
15. –
16. –
17. Speaker Wire Strain Reliefs (2)
18. Weather Resistant Enclosure
19. Mounting Tab
20. Bottom Panel Access Door: (For easier access, loosen the 2 forward screws on each side & then pull panel downward)
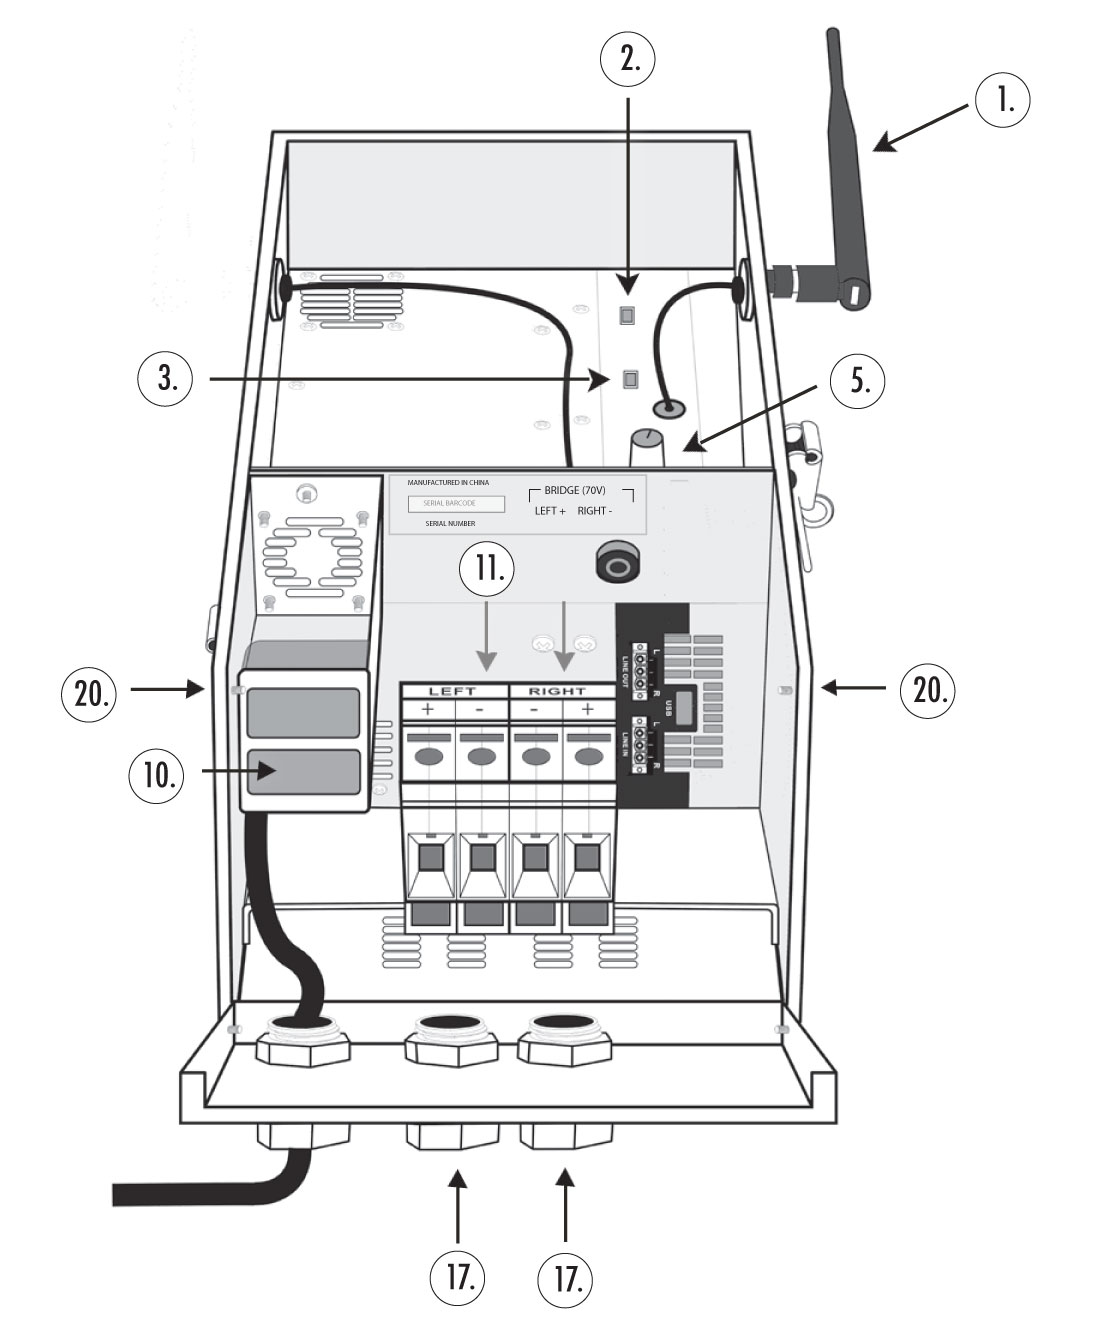
FRONT FACE VIEW
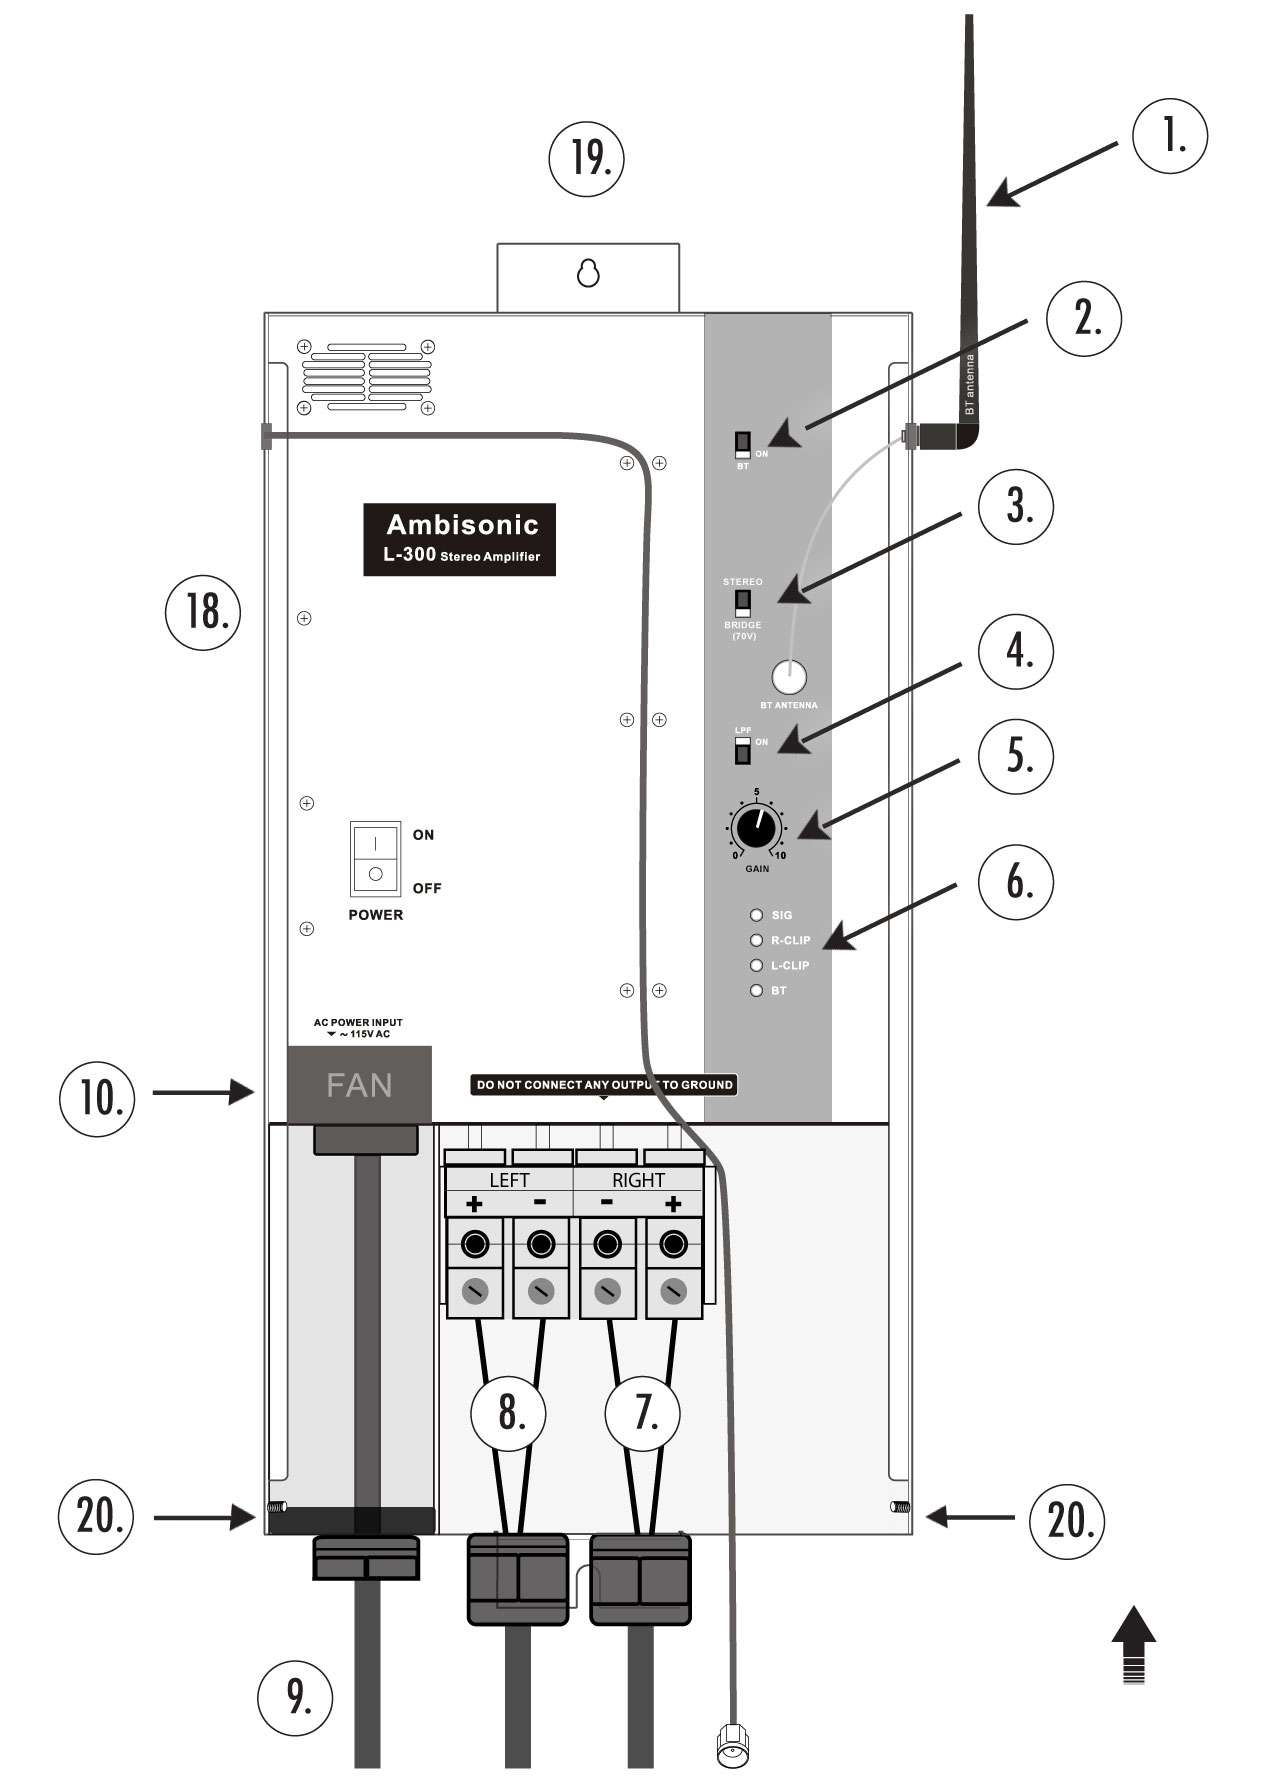
UNDERSIDE VIEW
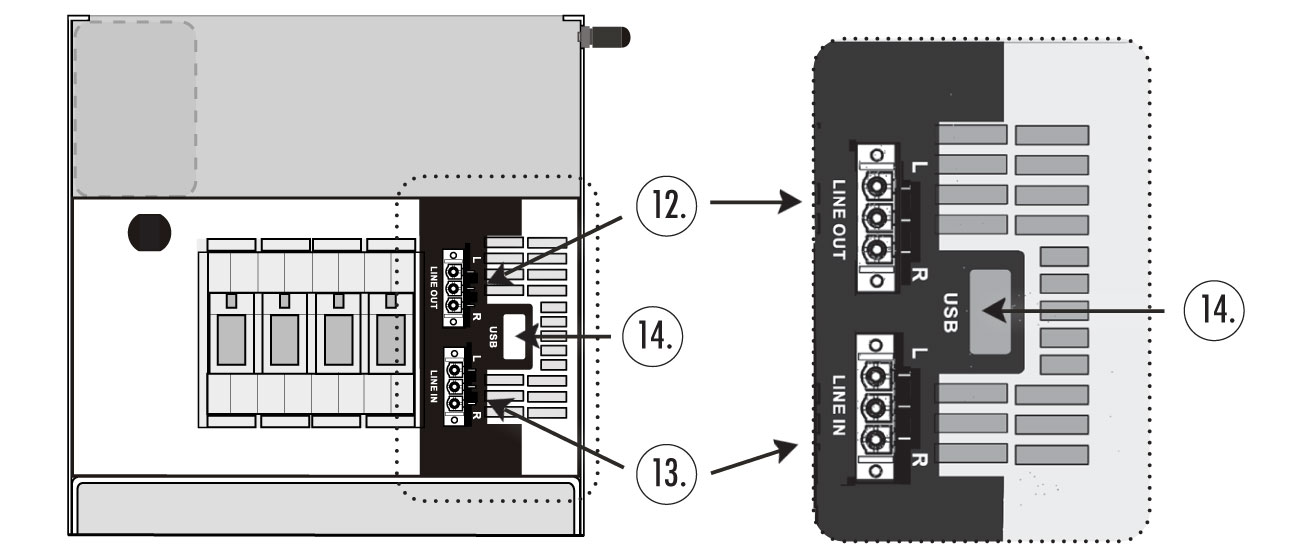
L-300 Amplifier Features (With Streamer)
| 1. Bluetooth Antenna (2) 2. Bluetooth Switch 3. Bridge (70V) or Stereo Switch 4. Low Pass Filter (LPF) Switch 5. Gain Knob 6. Clipping/BT Indicator Lights 7. Speaker Output: Right 8. Speaker Output: Left 9. 120V AC Input 10. Fan 11. Bridge (70V) Speaker Output L+ & R- |
12. Line OUT Phoenix Connection 13. Line IN Phoenix Connection 14. USB 5V Power Port 15. Streamer 16. RJ45 Internet Hardwire 17. Speaker Wire Strain Reliefs (2) 18. Weather Resistant Enclosure 19. Mounting Tab 20. Bottom Panel Access Door: (For easier access, loosen the 2 forward screws on each side & then pull panel downward) |
2. Bluetooth Switch
3. Bridge (70V) or Stereo Switch
4. Low Pass Filter (LPF) Switch
5. Gain Knob
6. Clipping/BT Indicator Lights
7. Speaker Output: Right
8. Speaker Output: Left
9. 120V AC Input
10. Fan
11. Bridge (70V) Speaker Output L+ & R-
12. Line OUT Phoenix Connection
13. Line IN Phoenix Connection
14. USB 5V Power Port
15. Streamer
16. RJ45 Internet Hardwire
17. Speaker Wire Strain Reliefs (2)
18. Weather Resistant Enclosure
19. Mounting Tab
20. Bottom Panel Access Door: (For easier access, loosen the 2 forward screws on each side & then pull panel downward)
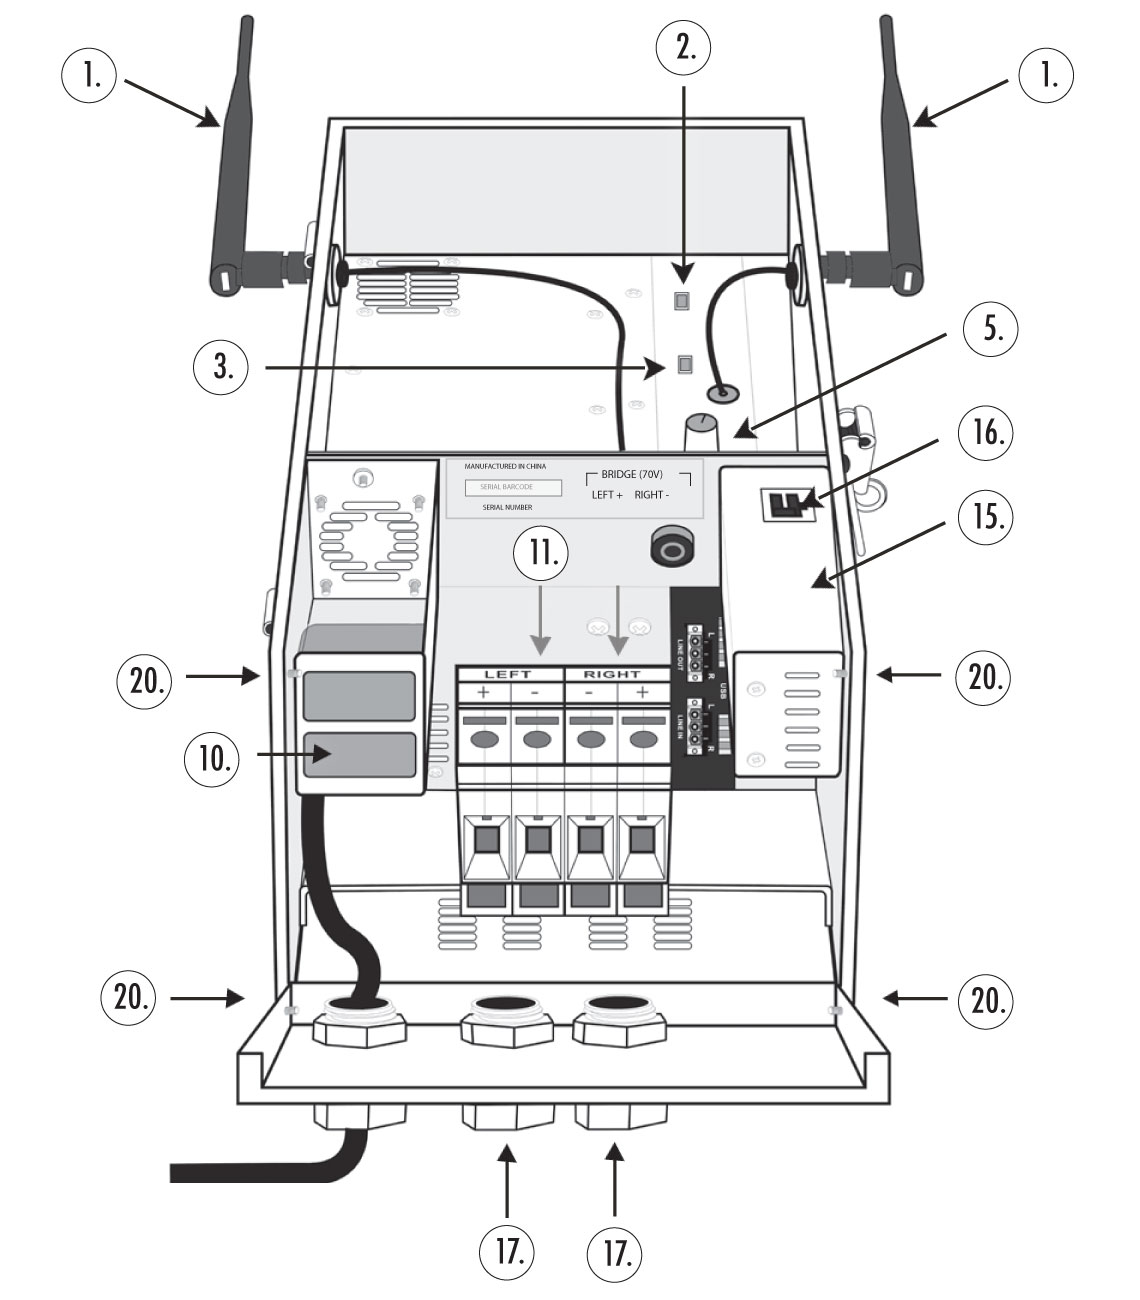
FRONT FACE VIEW
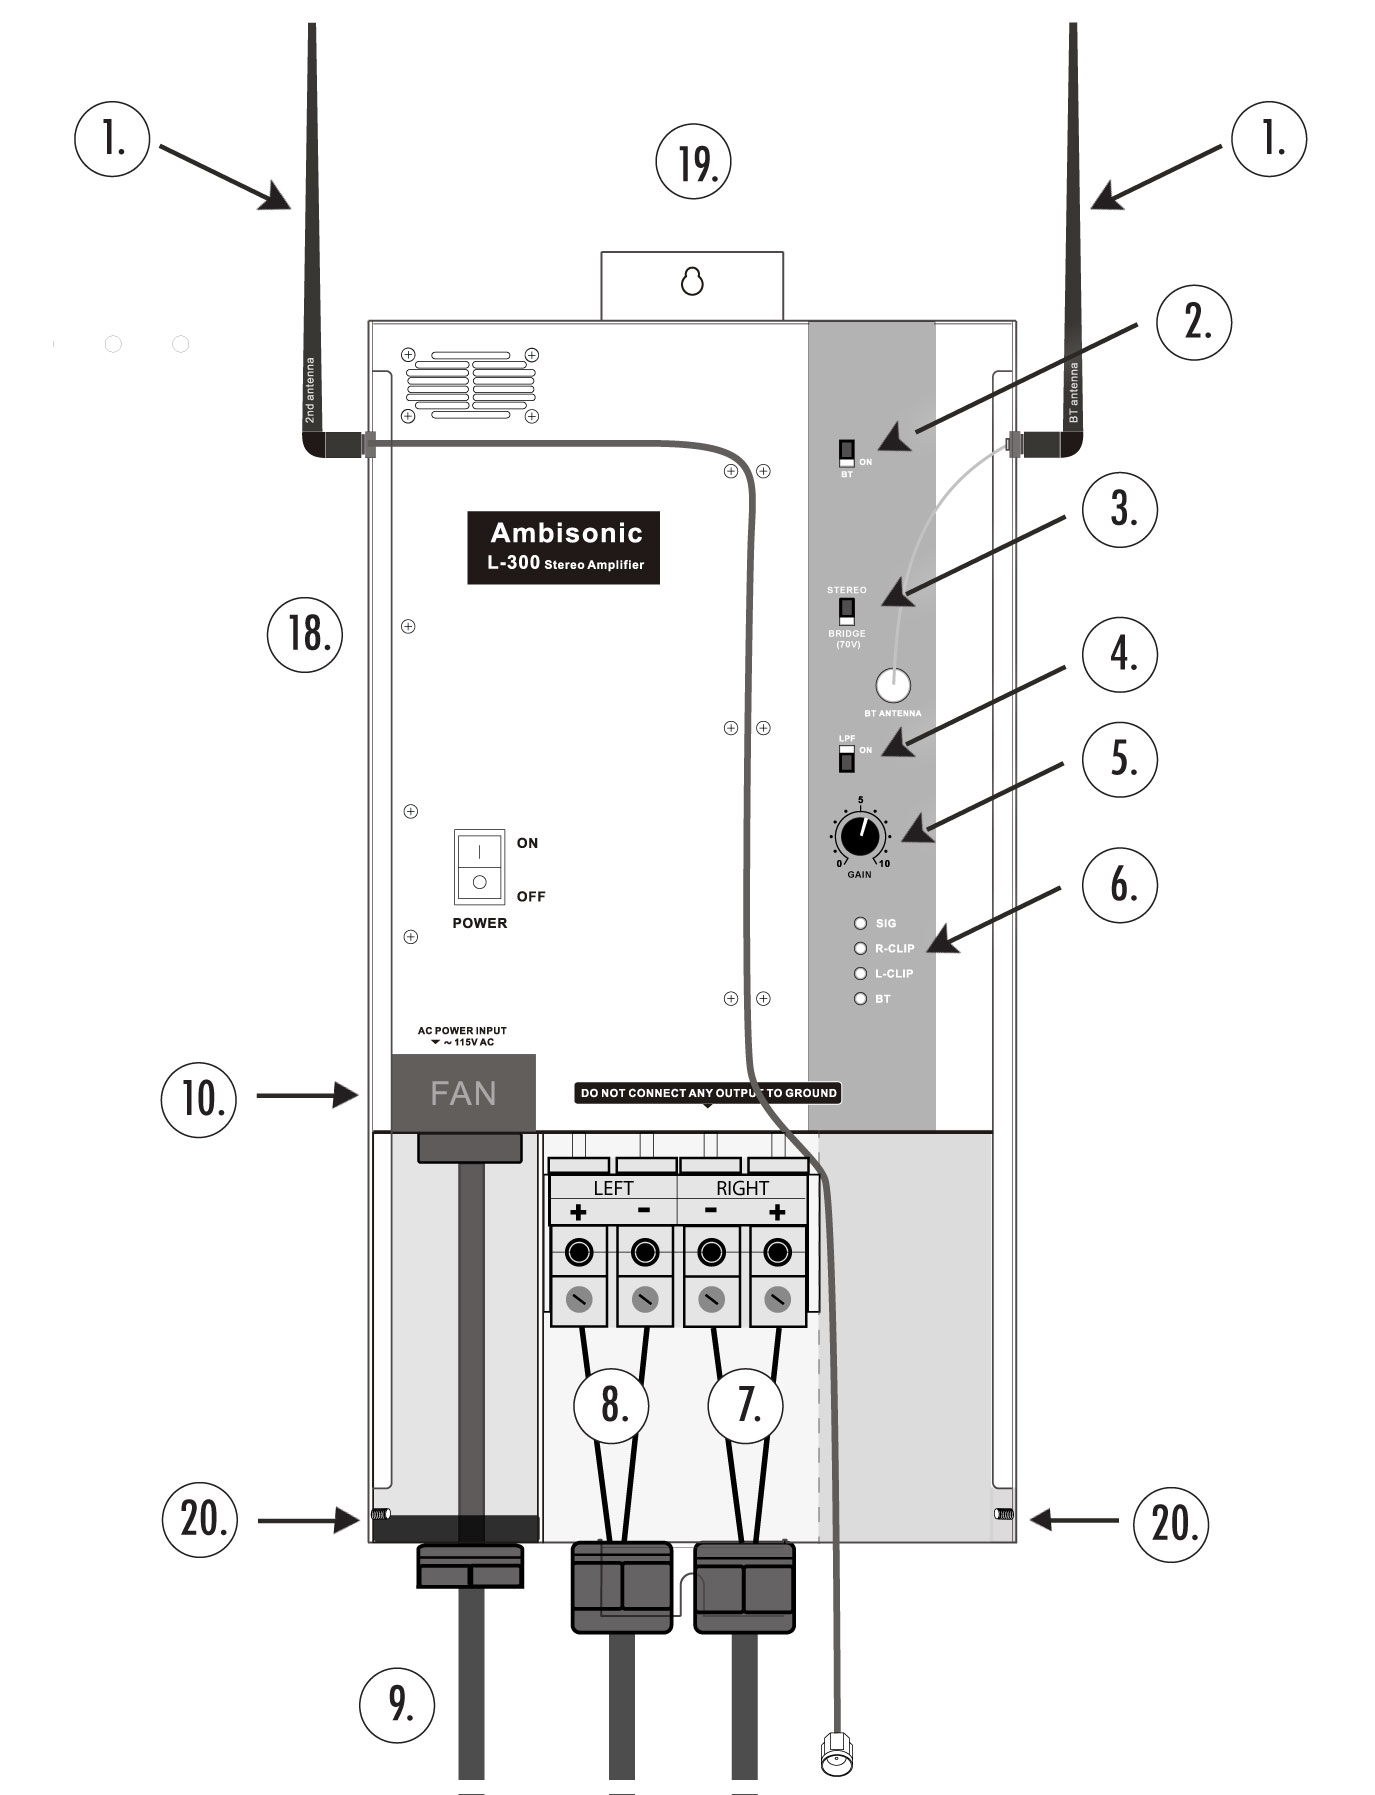
UNDERSIDE VIEW

System Planning & Installation
The speakers and subwoofer should be strategically placed to evenly distribute sound throughout the outdoor area. Fully plan out the locations of the amp, all speakers, subwoofer and buried wires, before beginning the installation process.
The system is designed for the speakers to be evenly divided between two PARALLEL wire runs, with the subwoofer connected to both. The wires will be buried in single 5” trench.
Positioning & Installing The Satellite Speakers
I. Speakers should be fairly evenly spaced, in a line, and aimed so they cover the listening area and so that sound is evenly dispersed around the outdoor space uniformly.
Δ For best coverage, we recommend spacing the speakers 8 – 15 feet apart.
Δ Use a minimum of 14 AWG wire.
Δ Do not place speakers in direct line with sprinkler spray.
II. Push the mounting spikes for the satellite speakers to vertically plumb into the ground.
Δ Be sure to have the wire hole on the side of the stake facing away from the listening area.
Δ If the ground is too firm to push the spike in all the way, remove the speaker from the spike and tap the spike in gently with a rubber mallet.
Δ Be careful not to use too much force on the spikes, because they can break.
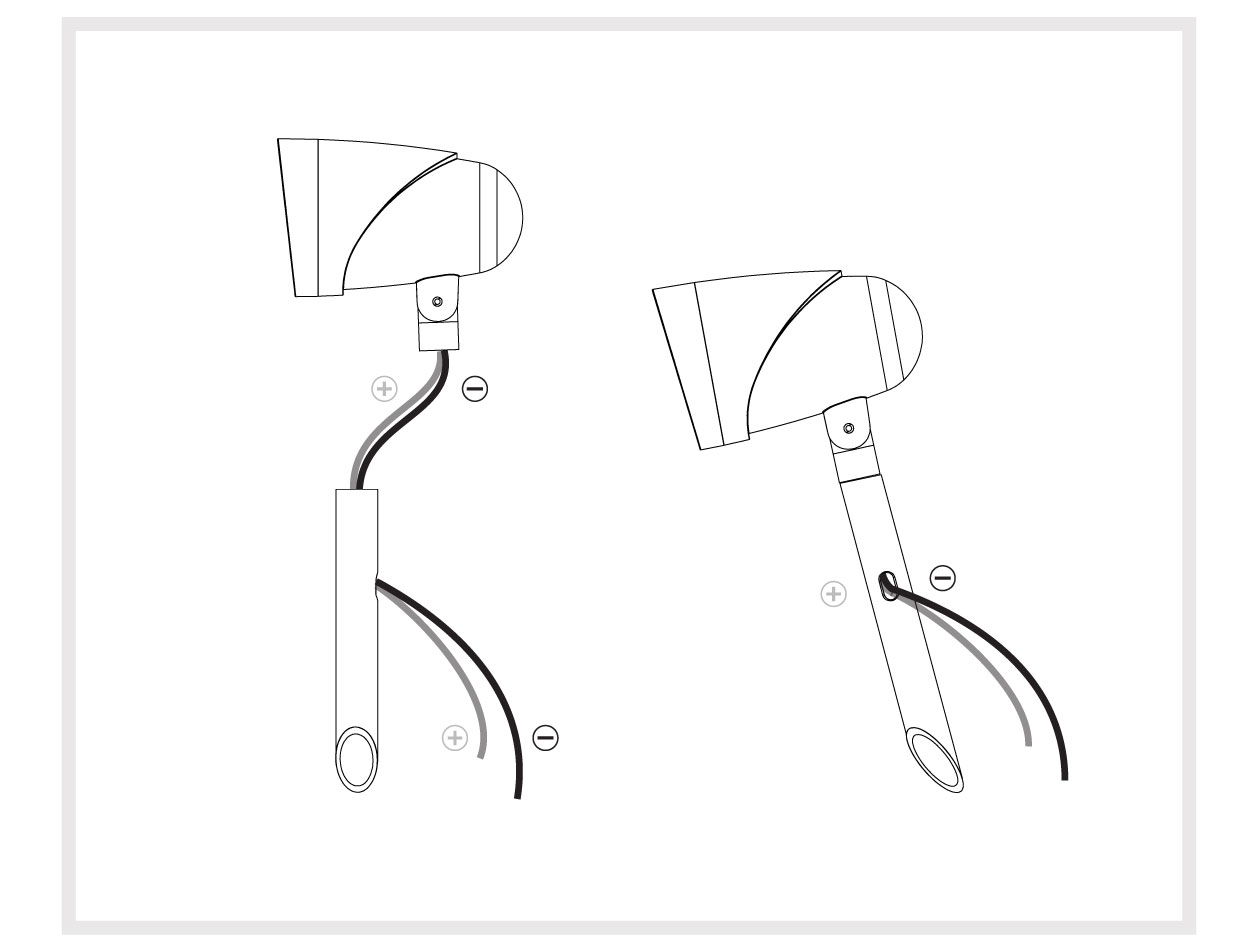
III. Feed the speaker wire through the top hole of the ground stake and out the wire hole on the side of the stake.
Δ The speaker can now be screwed onto the stake clockwise until tight.
Δ Using a 4mm hex wrench, adjust speaker angle to the direction of the listening area.
DIAGRAM 1 • LS64 Speaker Head Attachment
Positioning & Installing The Subwoofer
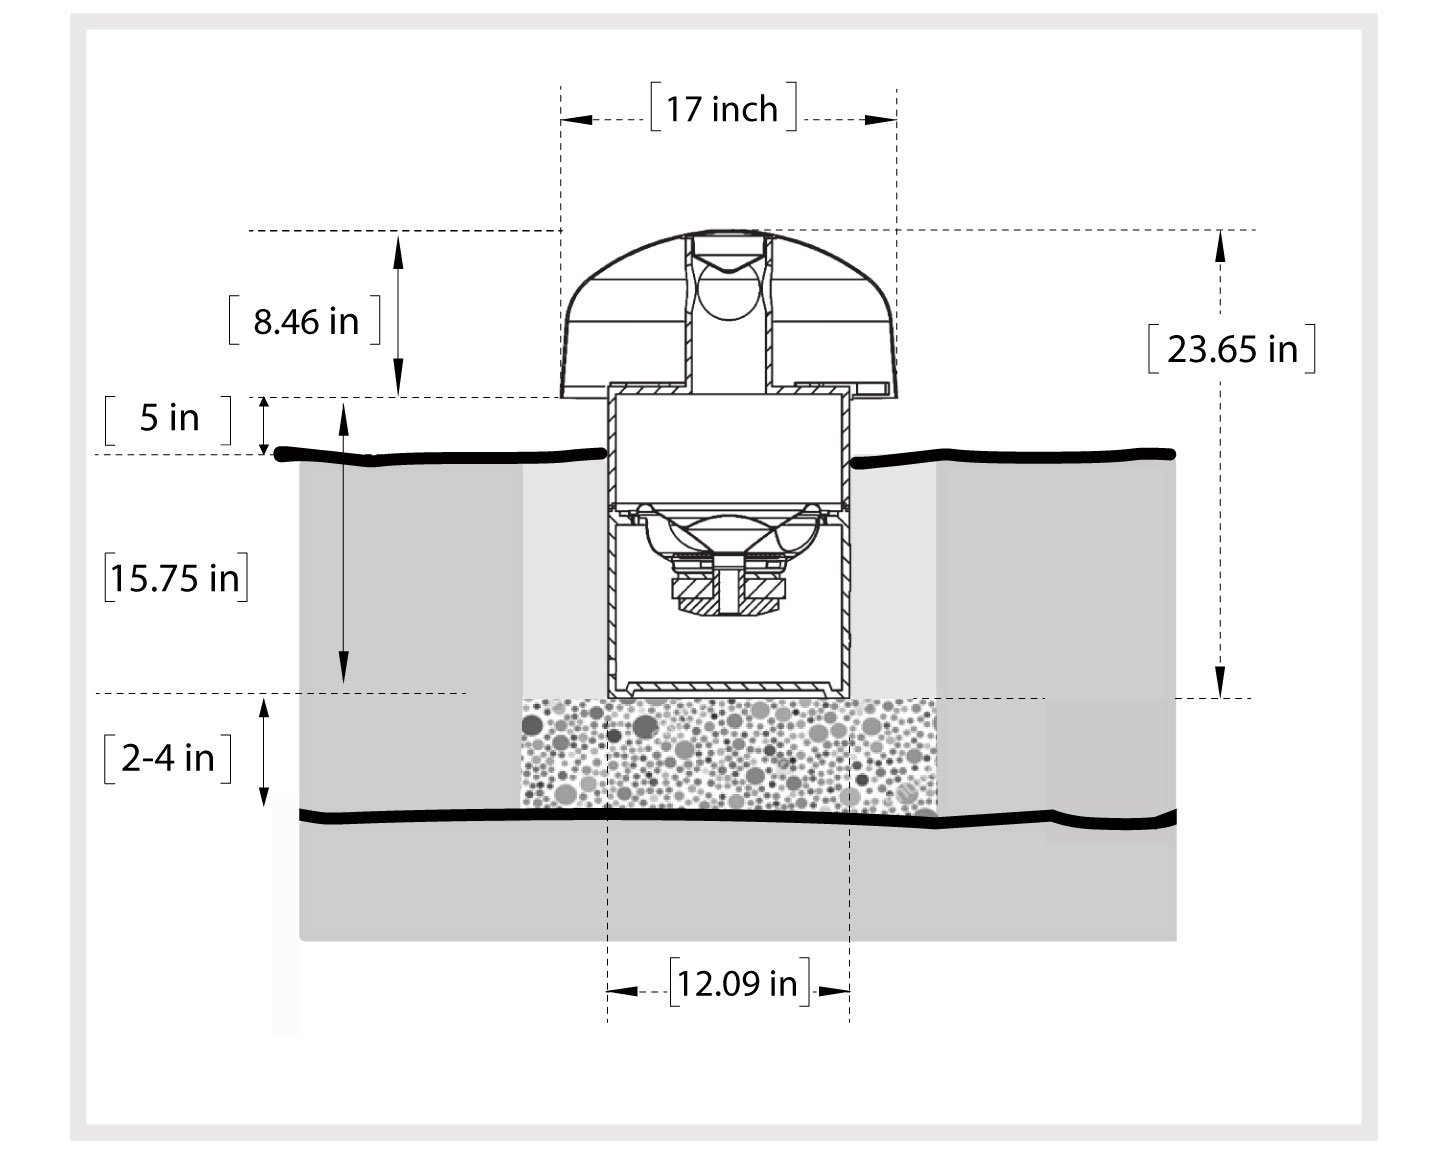
I. The S11BP-IG dimensions are 12 3/16” diameter x 23” high, 17” diameter x 18 7/16 Canopy.
Δ Select a location for the subwoofer. It should be placed as close to the middle of the speaker system as practical, ideally with half the satellite speakers on one side and half on the other.
Δ Subwoofer should be positioned away from standing water.
II. For more bass, install the subwoofer near a wall or other solid surface.
III. Make a hole 15’’ diameter x 8’’ deep and insert the subwoofer.
Place subwoofer, as level as possible, not tilted, in the center of hole & use loose dirt to level the subwoofer, ensuring the subwoofer is not in direct contact with any large rocks or large empty holes.
Fill remaining space around subwoofer with loose dirt.
Mount the Canopy to the Subwoofer Base. Ensure that all vents under the Canopy are exposed, allowing a visible space of about 5’’ from the ground level to the bottom edge of the Canopy.
DIAGRAM 2 • S11BP Subwoofer Burial Installation
Positioning & Installing The Amplifier
Δ Locate a shaded area for the amplifier to be installed out of direct sunlight.
Δ Mount amplifier to a wall or post located in a shaded area.
Δ Use a minimum of 14 AWG wire for sending a strong signal.
Do NOT Turn ON Amplifier until all Wiring is Complete
Ls Kit 3 | Set Up & Configuration
Running Wires from the Amplifier to the Speaker & Subwoofer
I. Dig a 5” trench where you plan on laying out the wire. Run the left and right speaker cables from the amplifier to the subwoofer location. The subwoofer should have four input connections:
Δ WHITE / Positive | GREEN / Negative (Left Channel)
Δ RED / Positive | BLACK / Negative (Right Channel)
DIAGRAM 3 • Wiring from L-300 Amp to S11BP Subwoofer
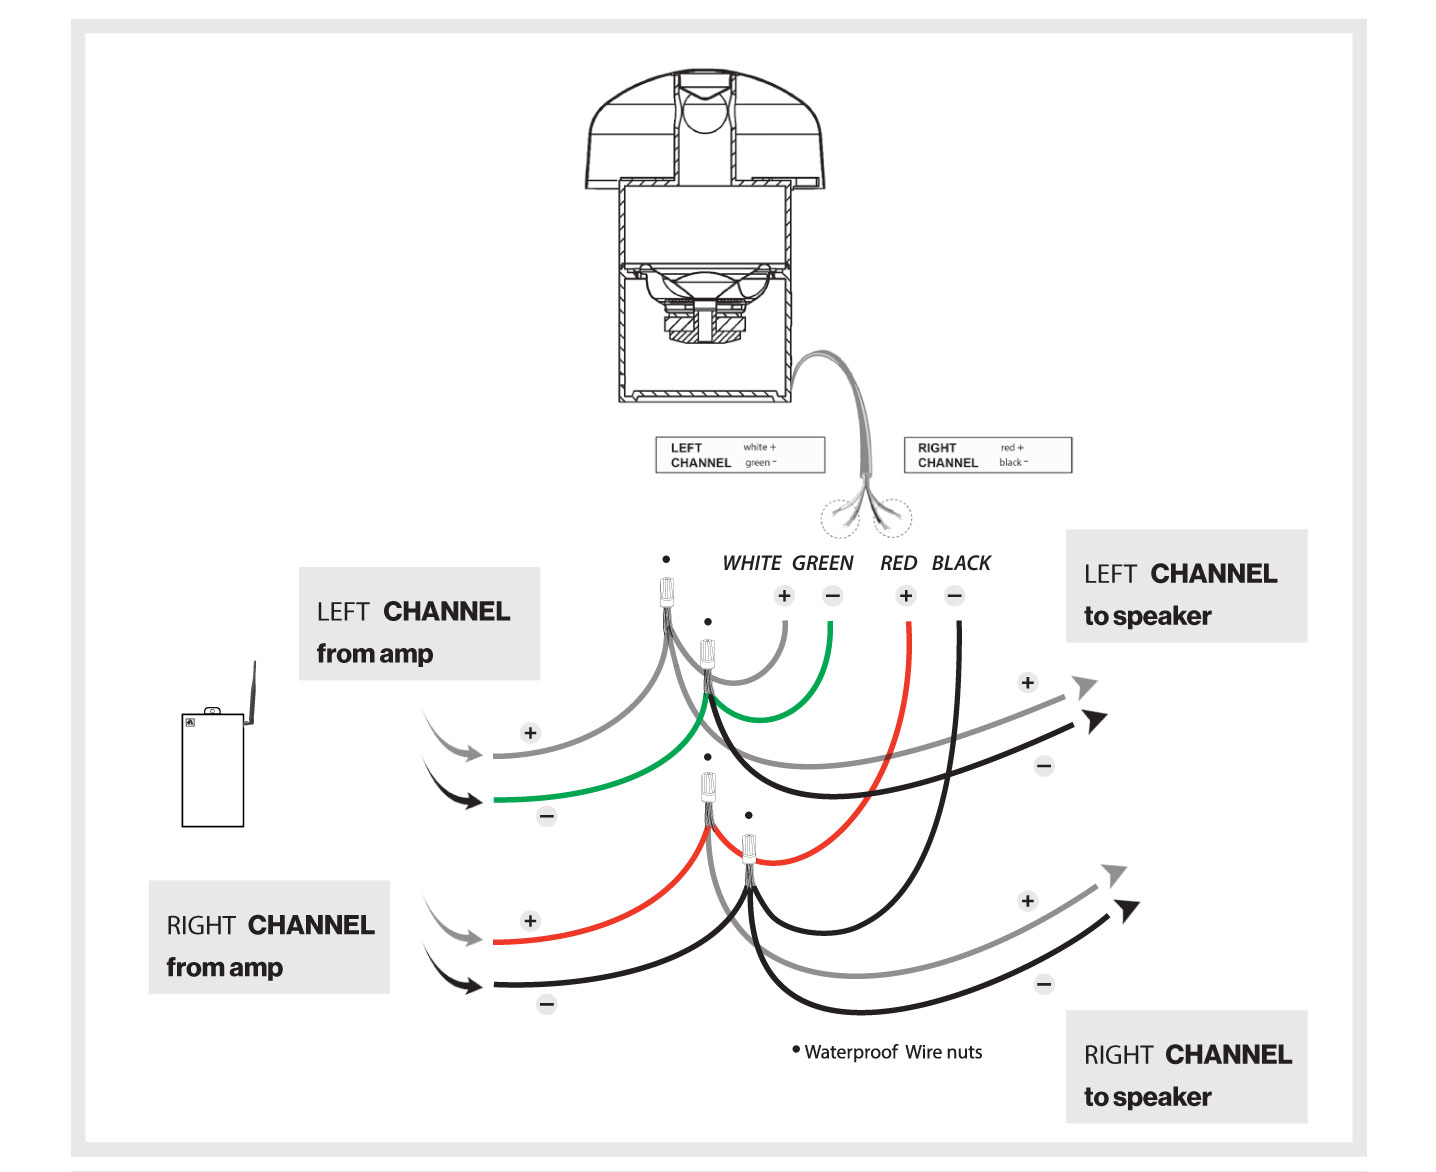
Using waterproof wire nuts, connect both left and right channels from the amp to the subwoofer, making sure positive is connected to positive and negative is connected to negative.
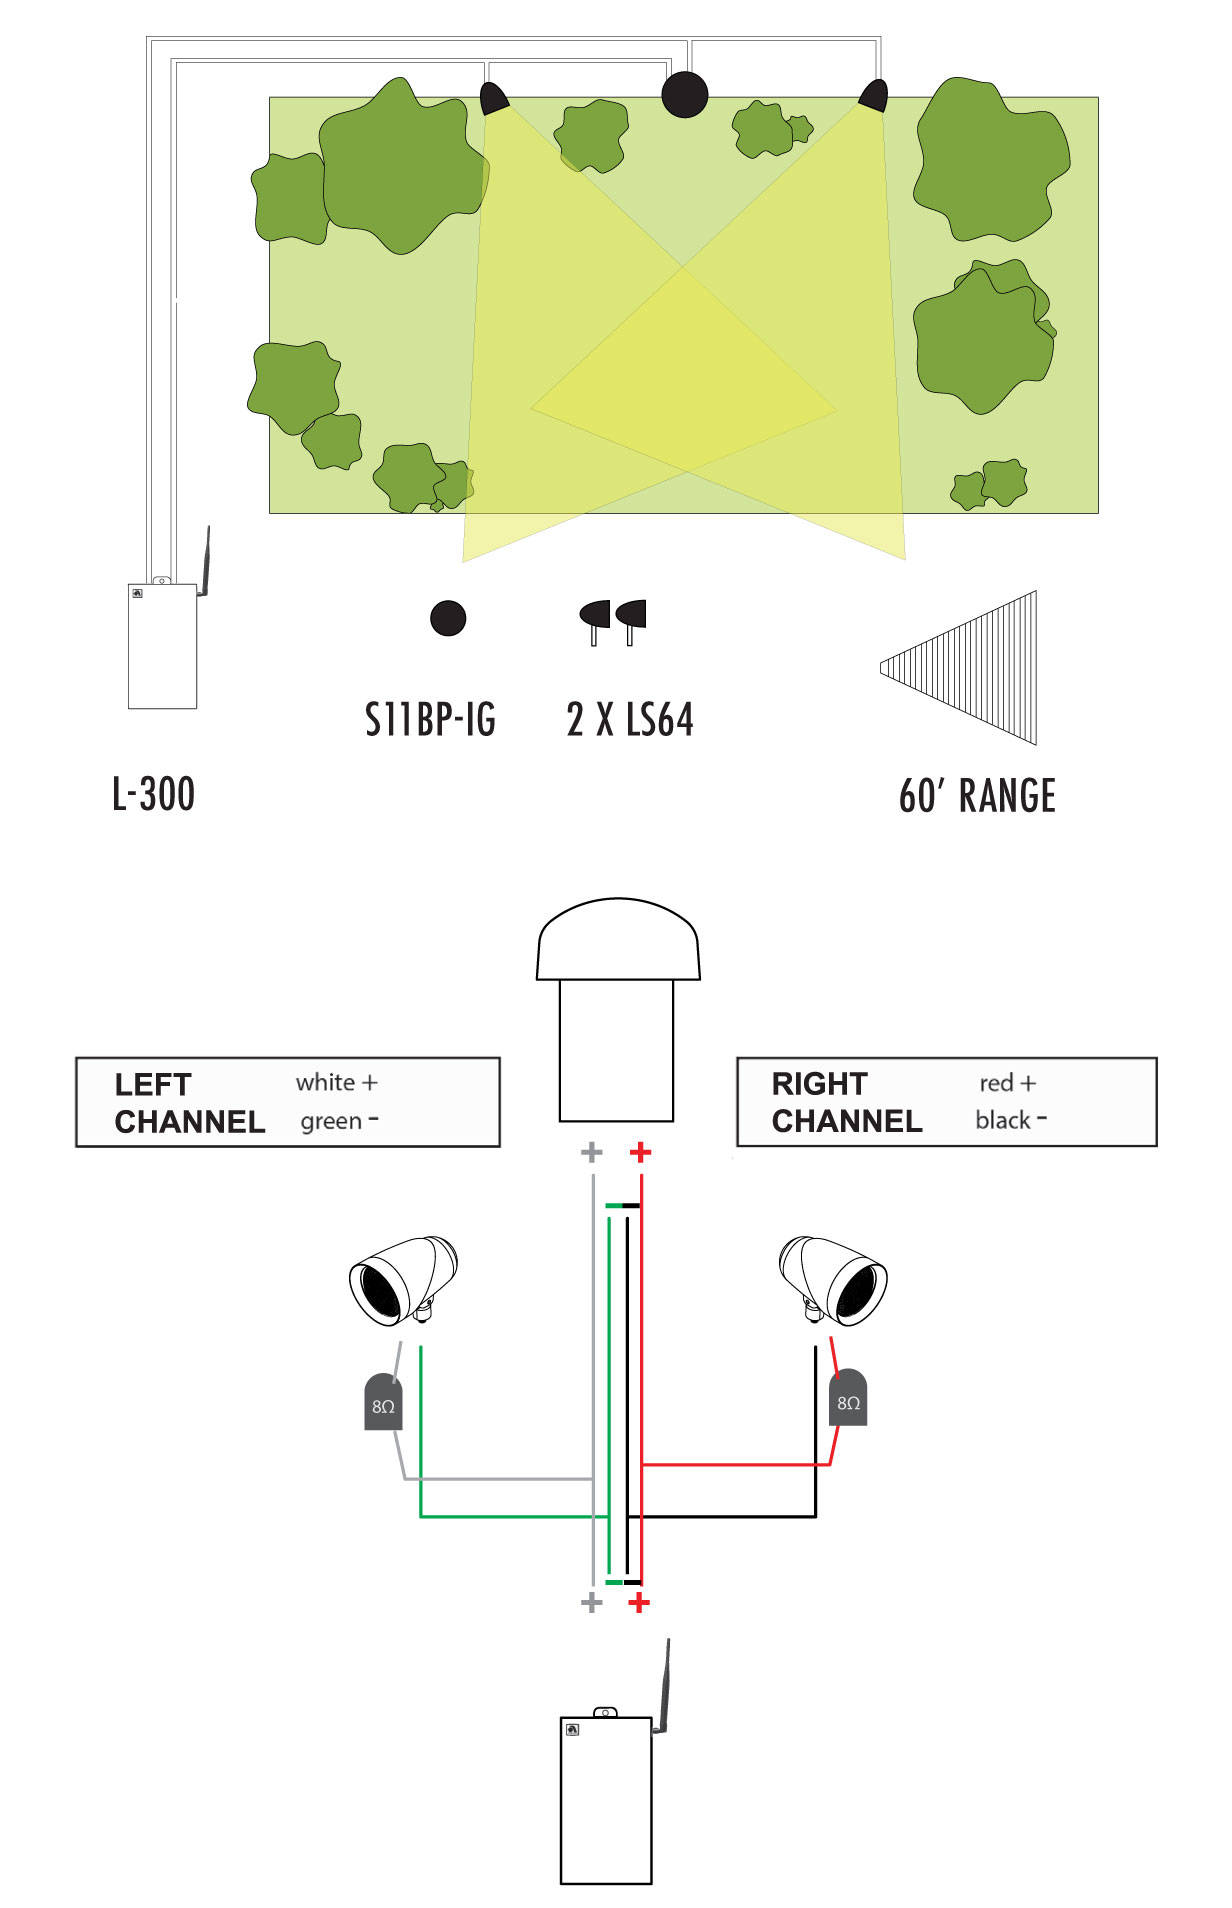
DIAGRAM 4 • LS KIT 3 | Wiring Diagram
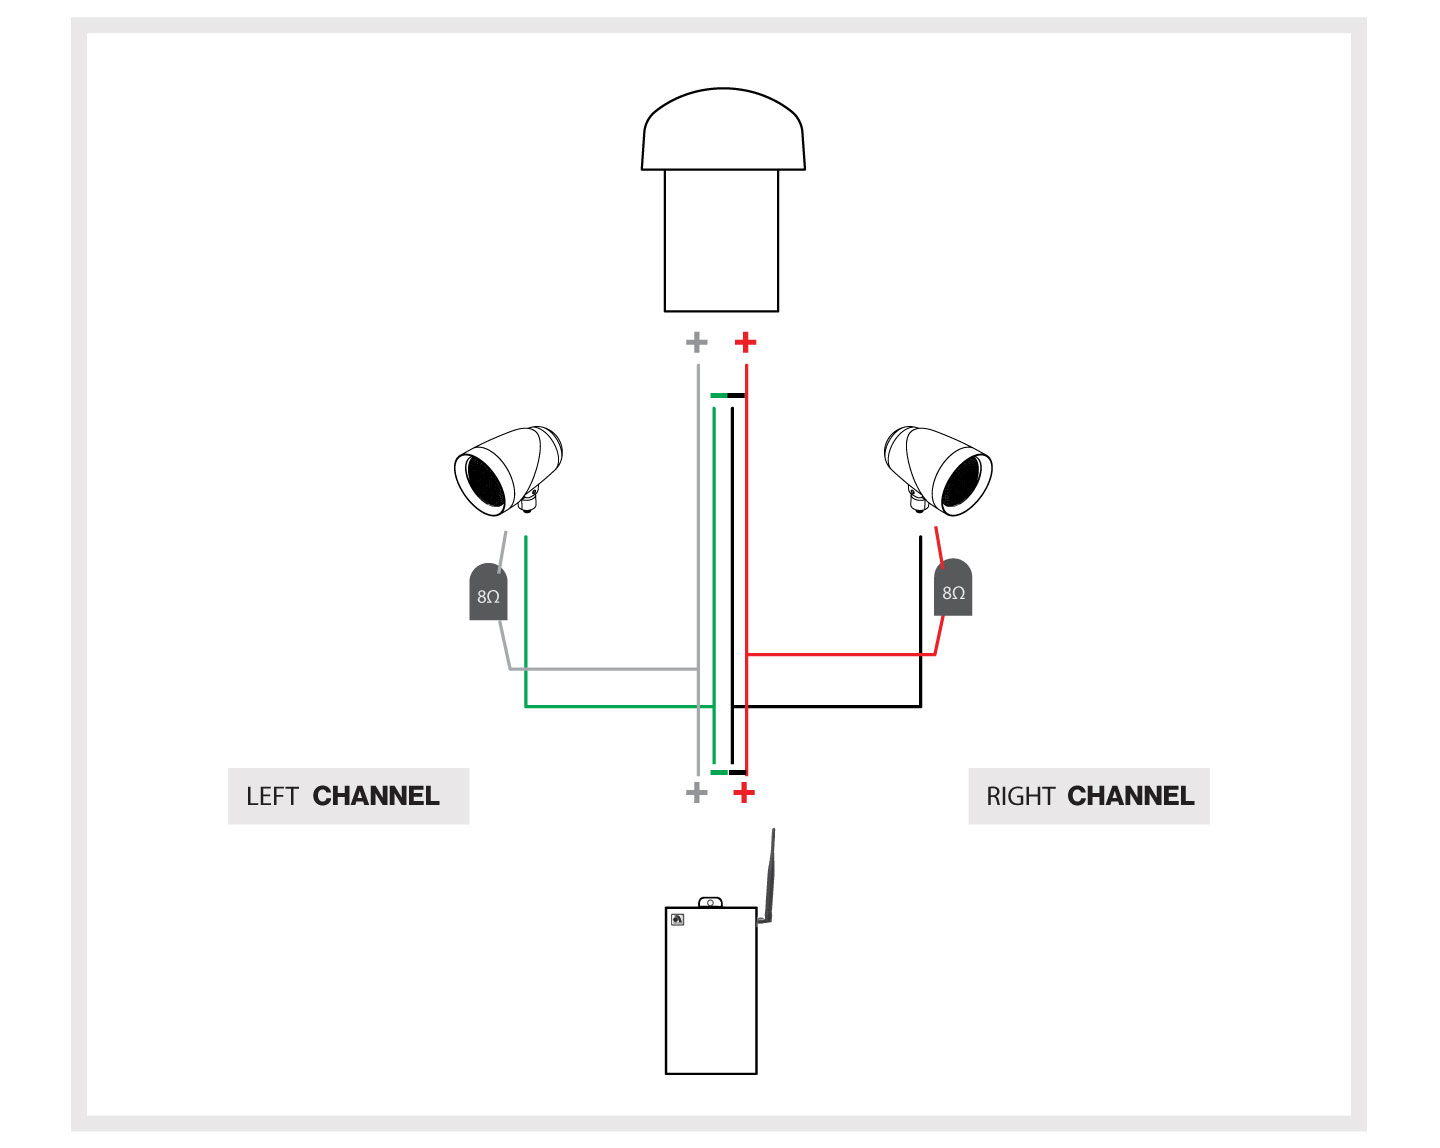
II. From the subwoofer location, extend the left speaker cable to the left satellite speaker, and the right speaker cable to the right satellite speaker, using a parallel connection from the subwoofer.
Strip ½” of the jacket off the ends of all cables.
III. Connect the LEFT positive conductor from the amp, to the LEFT positive (White Wire) input on the subwoofer.
Connect the LEFT negative conductor from the amp, to the LEFT negative (Green Wire) input on the subwoofer.
Δ Left Channel: WHITE = Positive | GREEN = Negative
Extend from the subwoofer to the LEFT satellite speaker.
At the LEFT satellite speaker, connect the RESISTOR in line with the LEFT positive to LEFT positive wire and the LEFT negative to LEFT negative wire.
Extend from the connected RESISTOR to the LEFT satellite speaker. Connect the LEFT positive to the RED positive wire and the LEFT negative to the BLACK negative wire of the LEFT satellite speaker. See Diagram 5.
IV. Connect the RIGHT positive conductor from the amp, to the RIGHT (Red Wire) input on the subwoofer.
Connect the RIGHT negative conductor from the amp, to the RIGHT (Black Wire) input on the subwoofer.
Δ Right Channel: RED = Positive | BLACK = Negative
Extend from the subwoofer to the RIGHT satellite speaker. Connect the RESISTOR in line with RIGHT positive to the RIGHT positive wire and the RIGHT negative to the RIGHT negative wire of the RIGHT satellite speaker. See Diagram 5.
Extend from the connected RESISTOR to the RIGHT satellite speaker. Connect the RIGHT positive to the RED positive wire and the RIGHT negative to the BLACK negative wire on the RIGHT satellite speaker.
Connect speakers and subwoofer, using the supplied waterproof wire nuts. Make absolutely sure you always connect positive to positive and negative to negative. And be sure to connect right and left channels correctly.
If you wire Positive (+) to Negative (-), the system will not perform as it should. Make all speaker connections and test the system BEFORE burying the wire.
DIAGRAM 5 • LS KIT 3 | Resistor Wiring Diagram
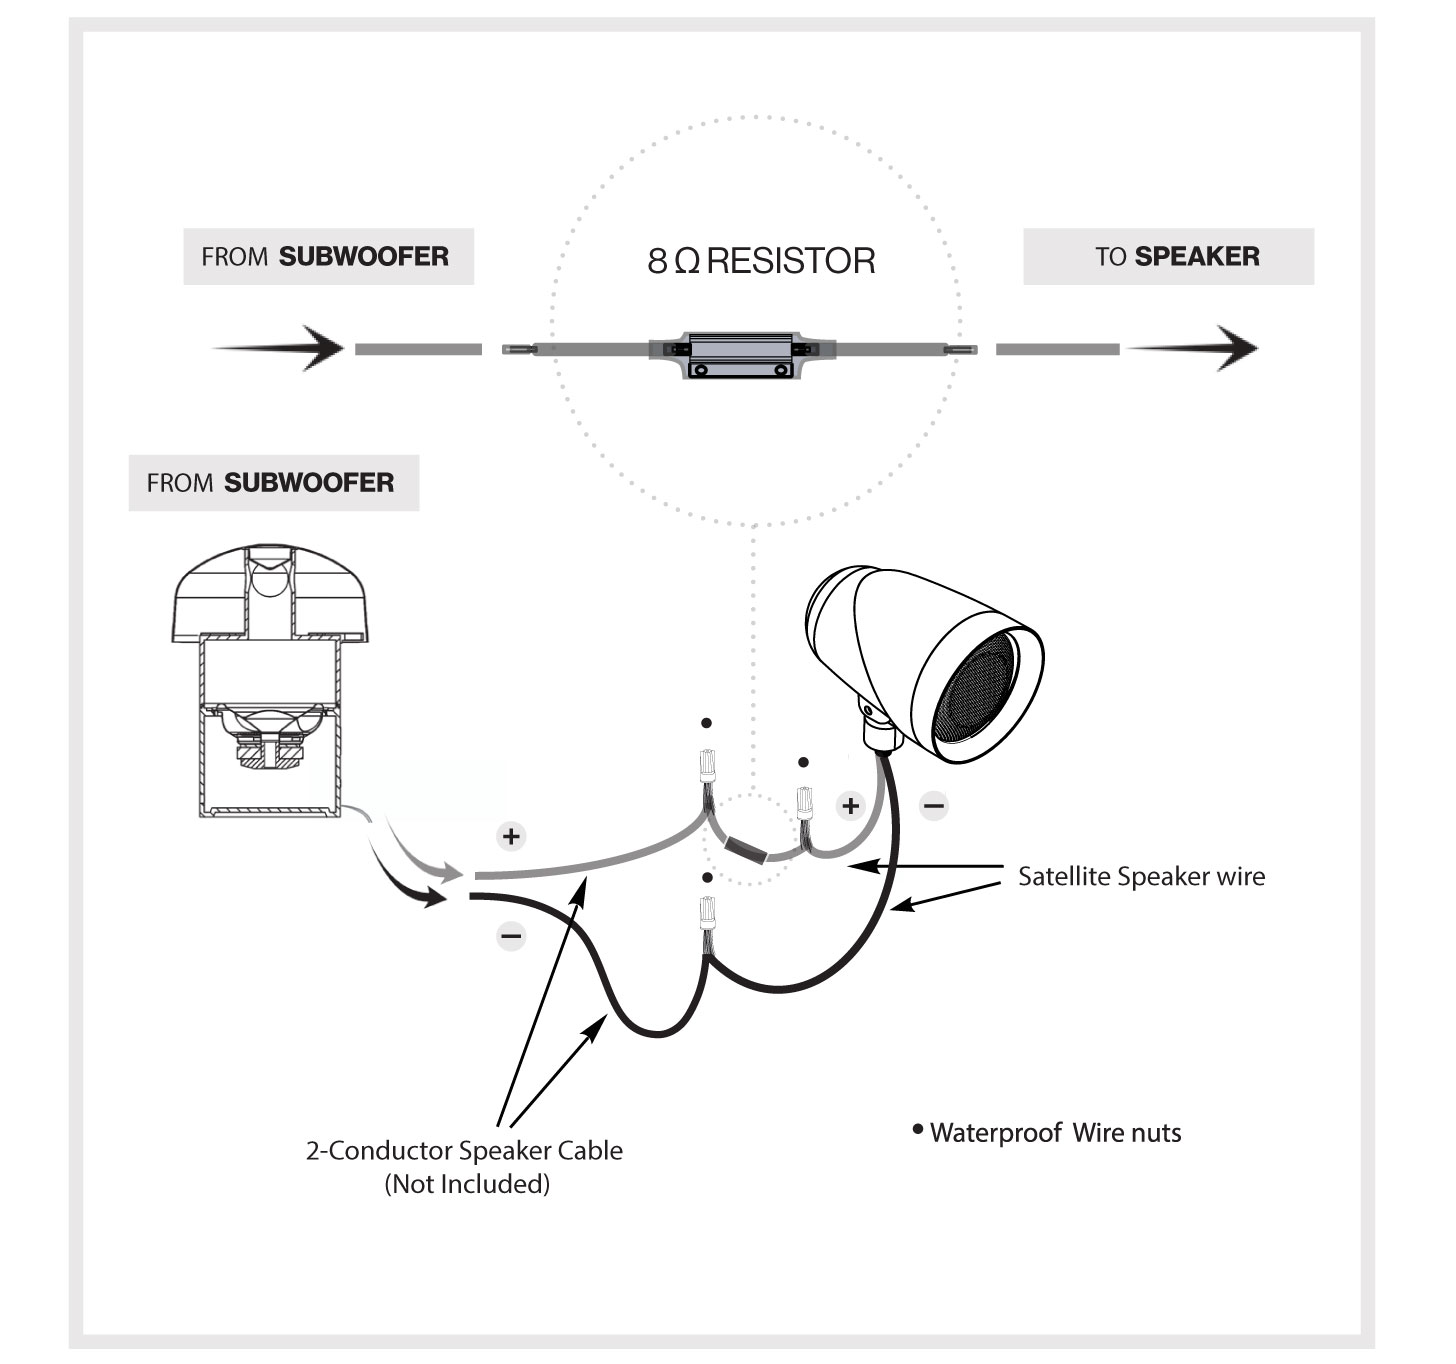
LS KIT 3 | L-300 AMPLIFIER CALIBRATION
Once the LS KIT 3 is wired up, follow these Calibration Steps:
Δ DO NOT ENGAGE BRIDGE MODE FOR ANY OF THE KITS
Δ ONLY ENGAGE “LPF” ON THE SUBWOOFER AMP IN KIT 4
I. Use the Knob labeled “GAIN’’, and turn Counter Clockwise, all the way down to the left, towards the number 0.
II. Connect your Bluetooth source device and turn its volume all the way up. Play some music.
III. Slowly turn the “GAIN’’ Knob on the L300 Amp Clockwise, to the right, toward the number 10.
As soon as you see the “CLIPPING” lights start to flicker red, turn the knob back to the left slightly, so the clipping lights do not show. Now this is the ideal position & should be left as is, so volume can be controlled from the source device.
IV. After following these calibration steps, ONLY the source device should be used to control volume during future use.
Once you’re confident that the system is working correctly, go ahead and bury the wires. After the wires are buried, check the system once again to make sure all the speakers and the subwoofer are connected and working.
DIAGRAM 6 • L-300 Amplifier Set Up for LS KIT3
2. Bluetooth Switch
3. Bridge (70V) or Stereo Switch
4. Low Pass Filter (LPF) Switch
5. Gain Knob
6. Clipping/BT Indicator Lights
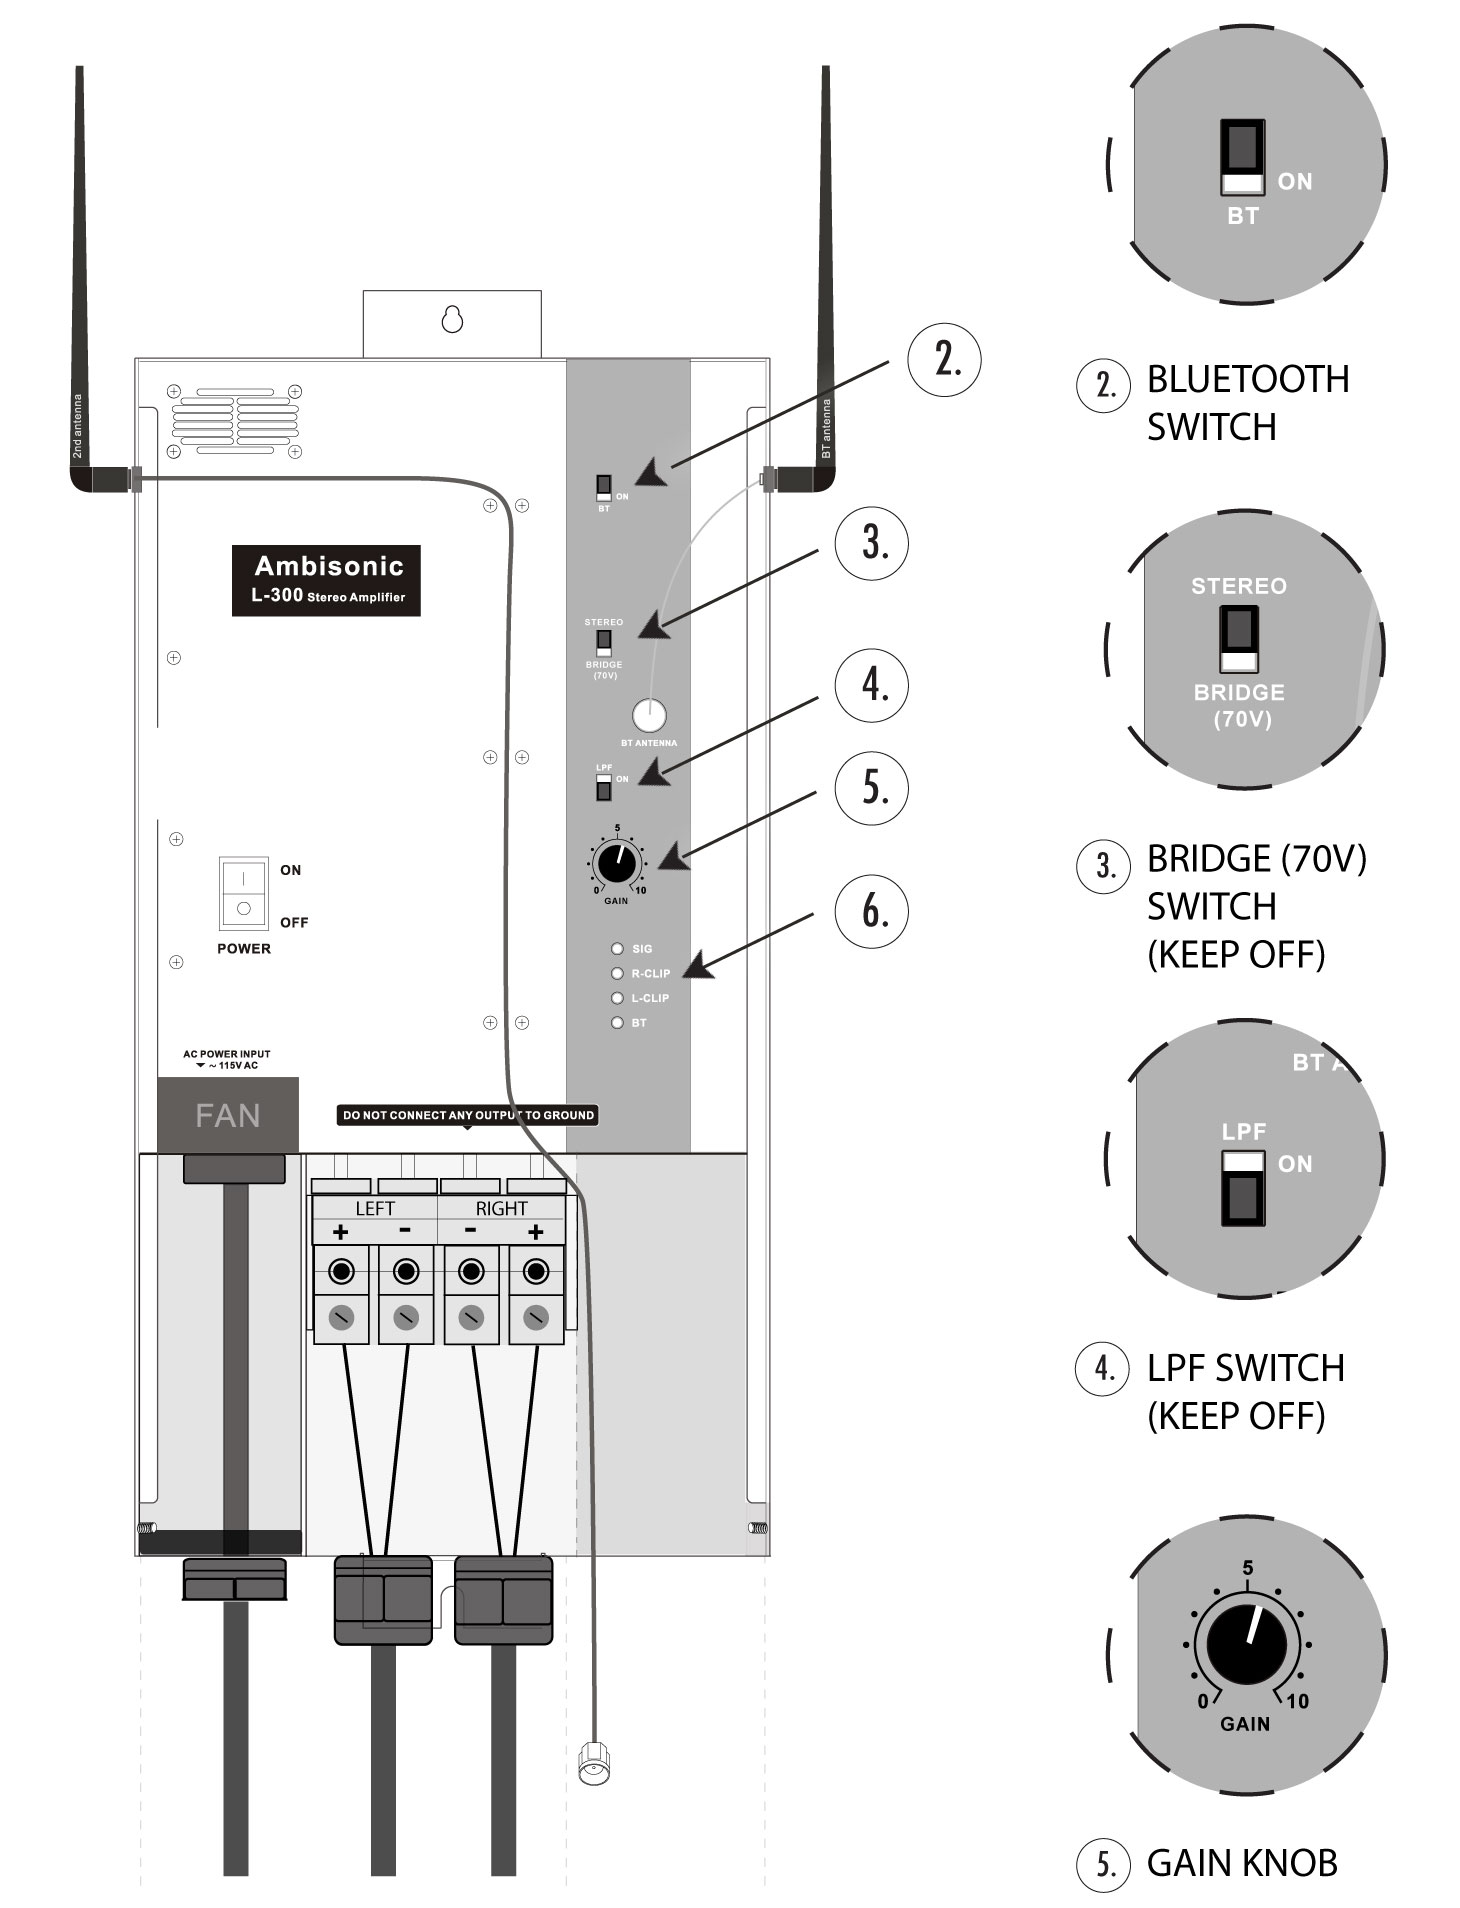
Ls Kit 4 | Set Up & Configuration
Running Wires from both Amplifiers: To Speakers & To Subwoofer
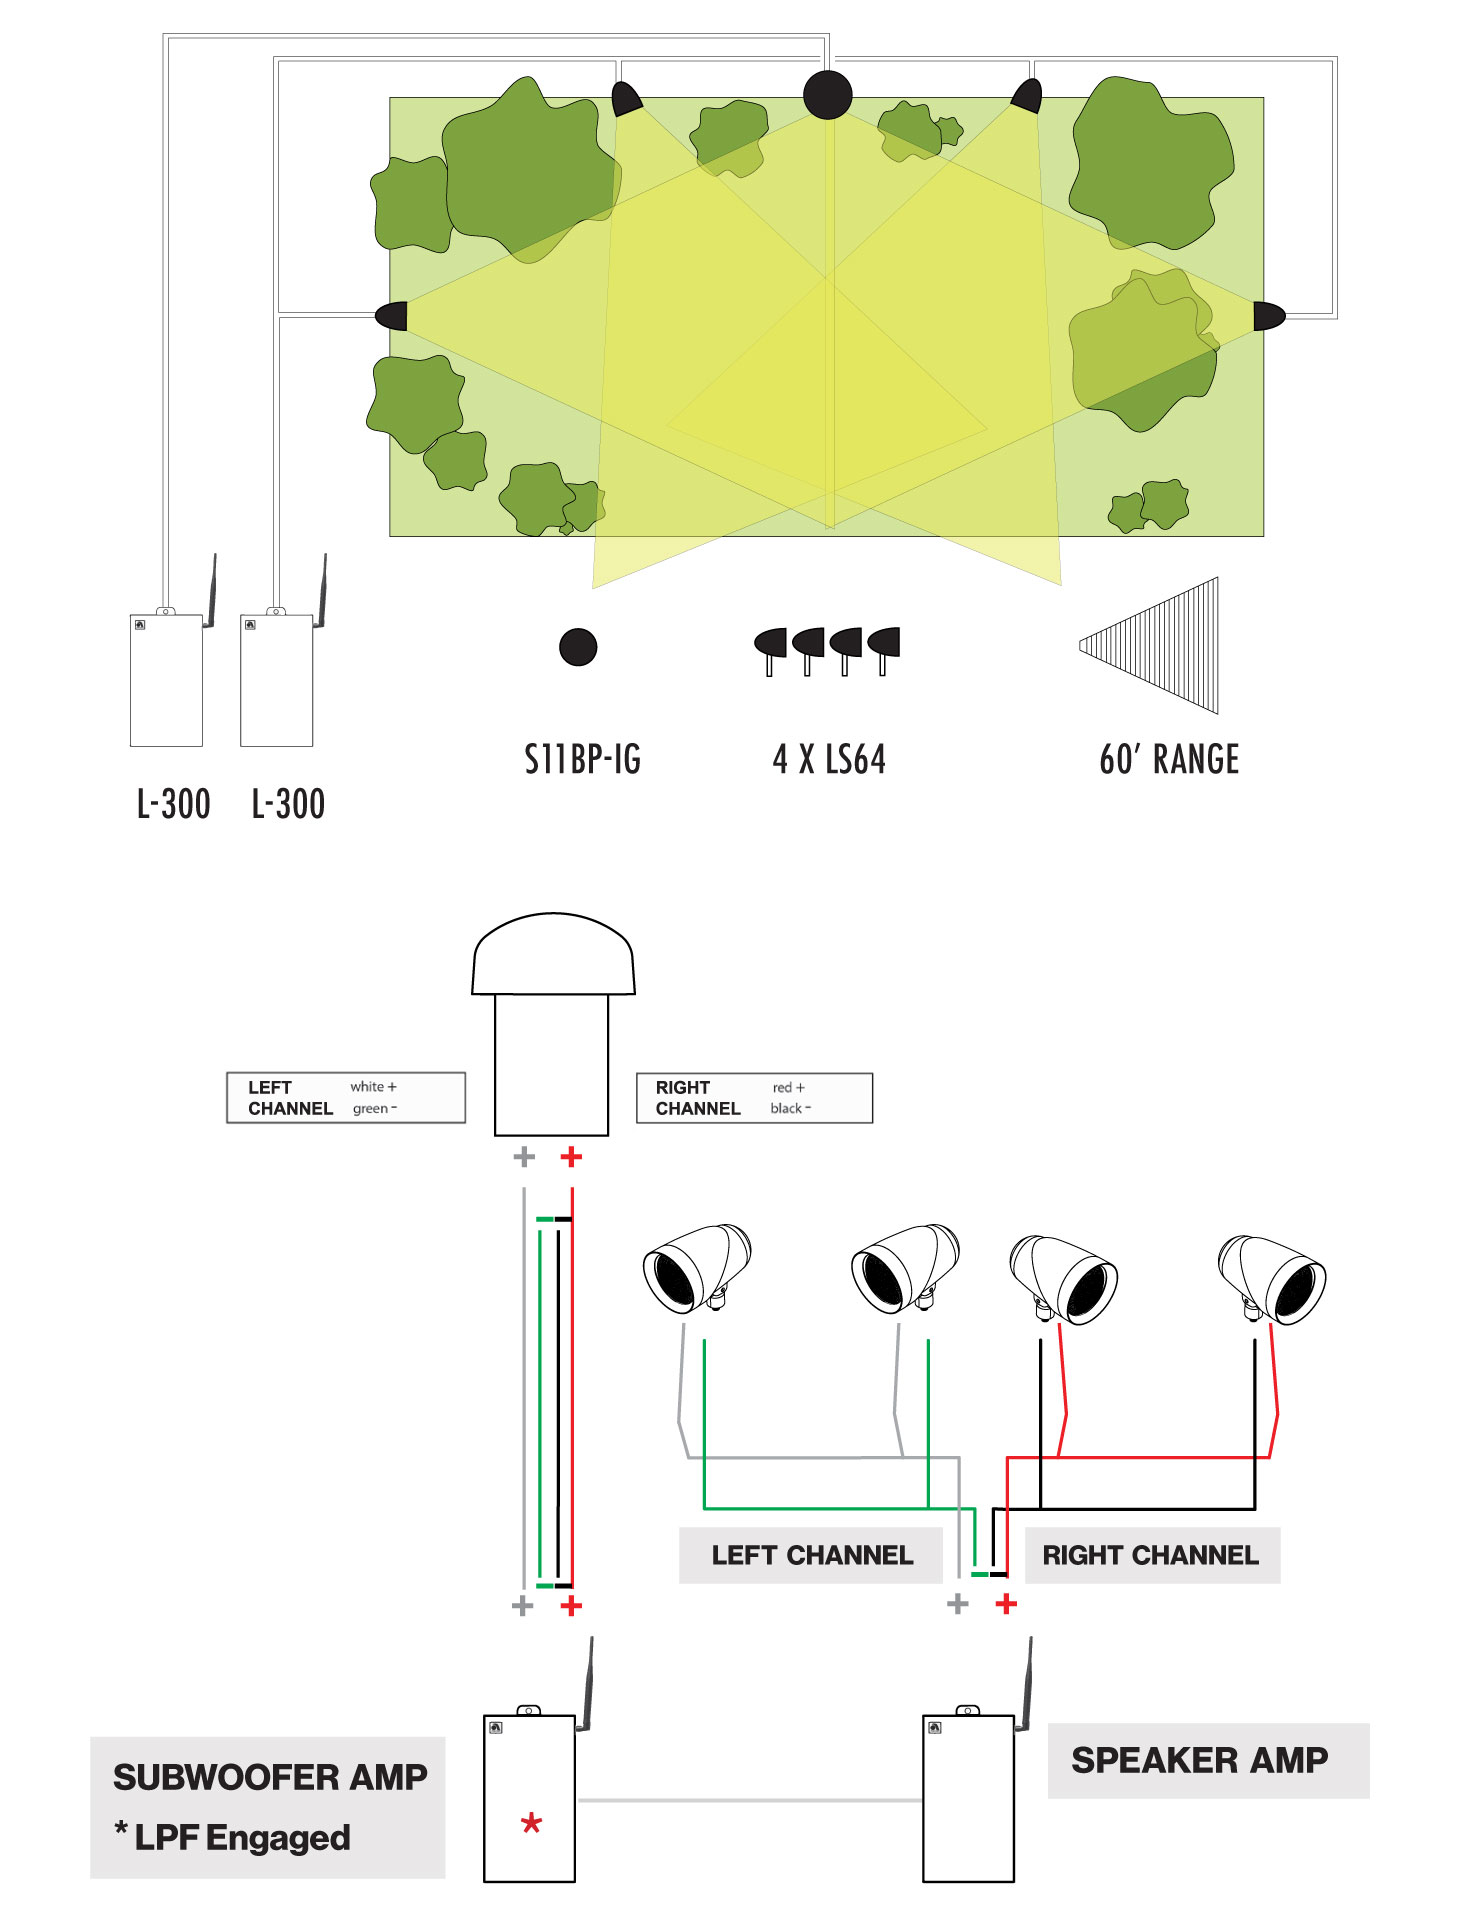
I. Dig a 5’’ deep trench where you plan on laying out the wire. Run the left and right speaker cables from the subwoofer amplifier to the subwoofer location.
II. Run the left and right speaker cables from the speaker amplifier to the speaker locations.
DIAGRAM 7 • LS KIT 4 | Wiring Diagram
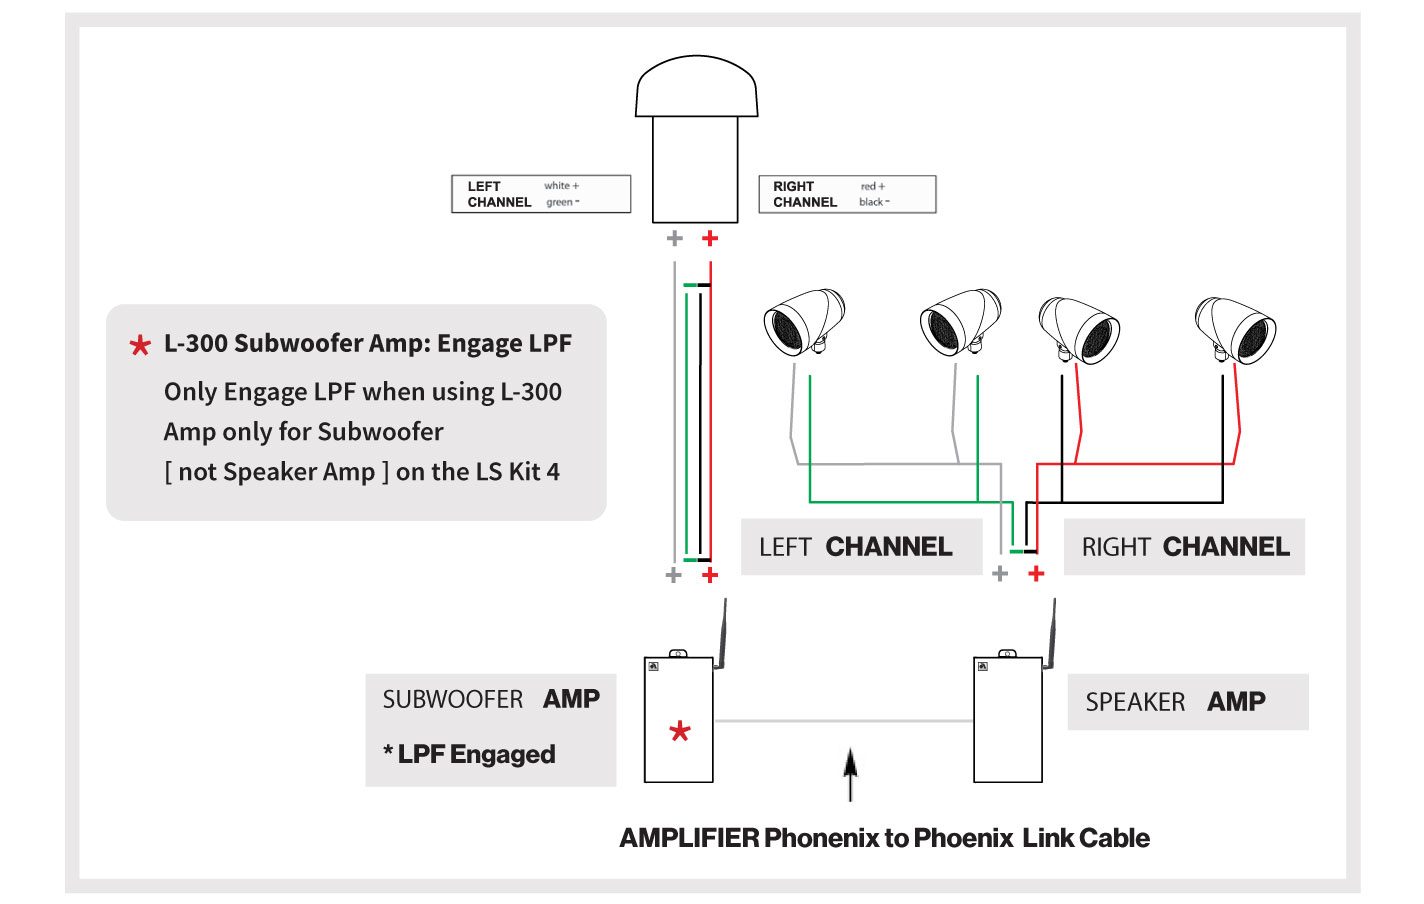
III. The subwoofer should have four input connections.
Δ WHITE / Positive | GREEN / Negative (Left Channel)
Δ RED / Positive | BLACK / Negative (Right Channel)
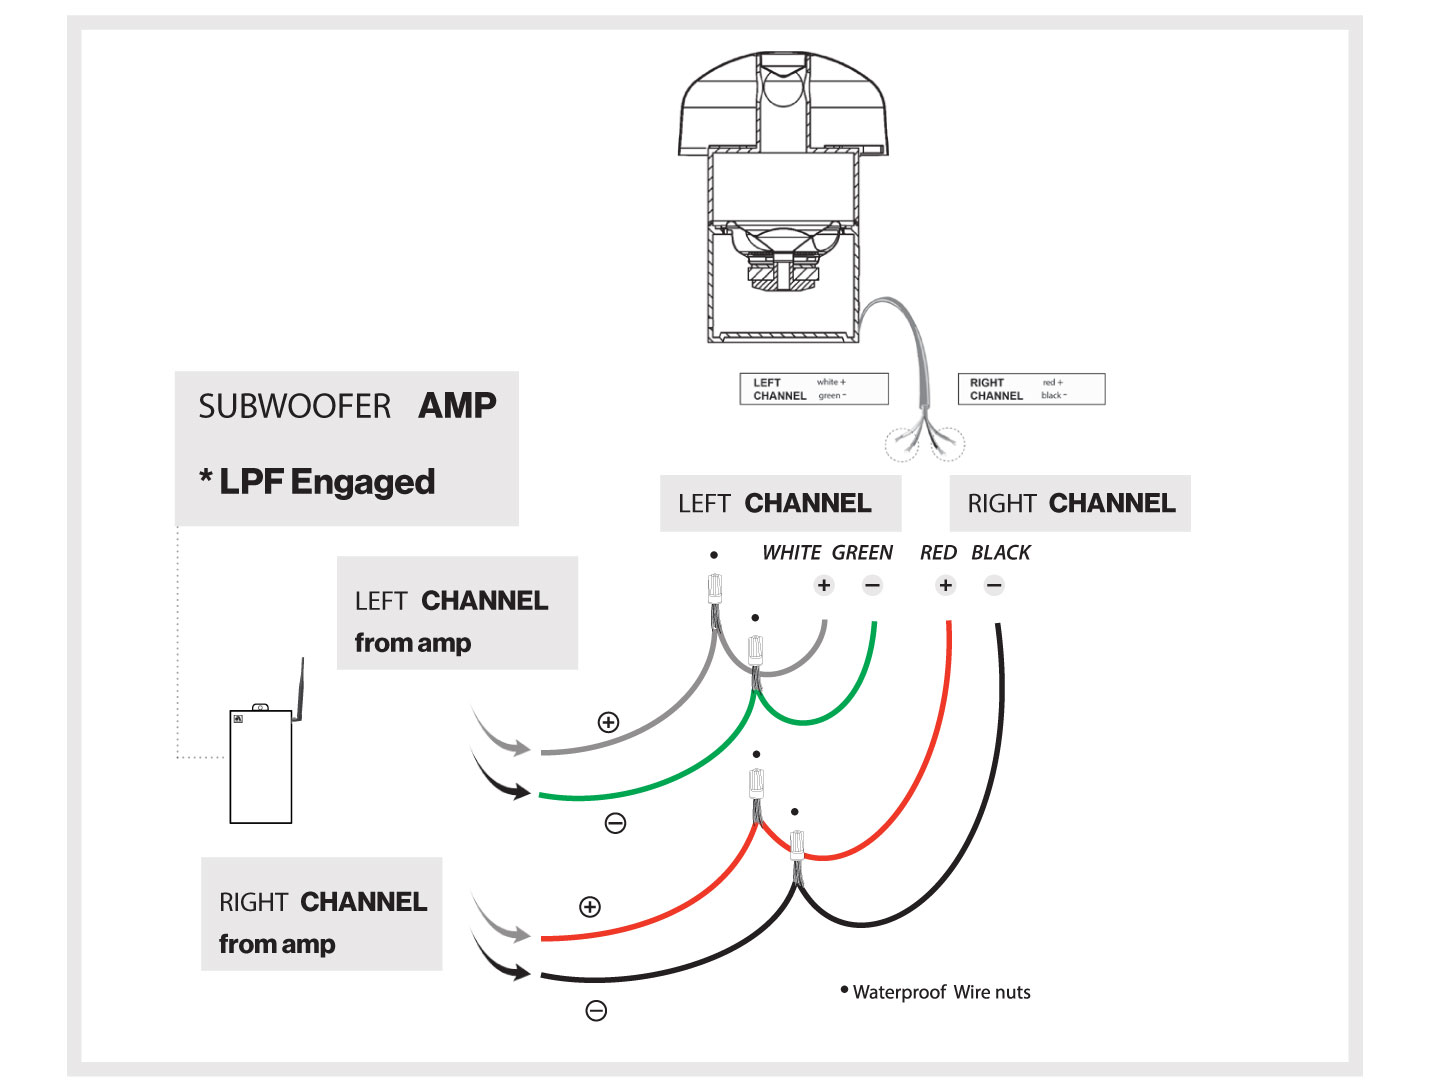
Using waterproof wire nuts, connect both left and right channels from the amp to the subwoofer, making sure positive is connected to positive and negative is connected to negative.
Running Wires from the Subwoofer Amp to the Subwoofer
I. Connect the LEFT positive conductor from the Subwoofer Amp, to the LEFT positive (White Wire) on the subwoofer.
II. Connect the LEFT negative conductor from the Subwoofer Amp, to the LEFT negative (Green Wire) on the subwoofer.
III. Connect the RIGHT positive conductor from the Subwoofer Amp to the RIGHT positive (Red Wire) on the subwoofer.
IV. Connect RIGHT negative conductor from the Subwoofer Amp to the RIGHT negative (Black Wire) on the subwoofer.
V. At the Subwoofer Amp, engage the LPF switch to ON
DIAGRAM 8 • Wiring from L-300 Amp to S11BP Subwoofer
Running Wires from the Speaker Amp to the Speakers
I. Connect the LEFT positive conductor from the Speaker Amp to the LEFT positive (Red Wire) on the 1st satellite speaker. Connect LEFT negative conductor from the amp to the LEFT negative (Black Wire) on the satellite speaker.
II. Extend from the LEFT Satellite Speaker to the 2nd Satellite Speaker. Connect the LEFT positive to the RED positive wire and the LEFT negative to the BLACK negative wire on the LEFT Satellite Speaker. See Diagram 8.
III. Connect the RIGHT positive conductor from the Speaker Amp to the RIGHT positive (Red Wire) on the satellite speaker. Connect RIGHT negative conductor from the speaker amp to the RIGHT negative (Black Wire) on the satellite speaker.
IV. Extend from the RIGHT satellite speaker. Connect the LEFT positive to the RED positive wire and the RIGHT negative to the BLACK negative wire on the RIGHT satellite speaker. See Diagram 8.
Make absolutely sure you always connect positive to positive and negative to negative. And be sure to connect right and left channels correctly.
If you wire Positive (+) to Negative (-), the system will not perform as it should.
11b. Linking Both Amplifiers for LS KIT 4
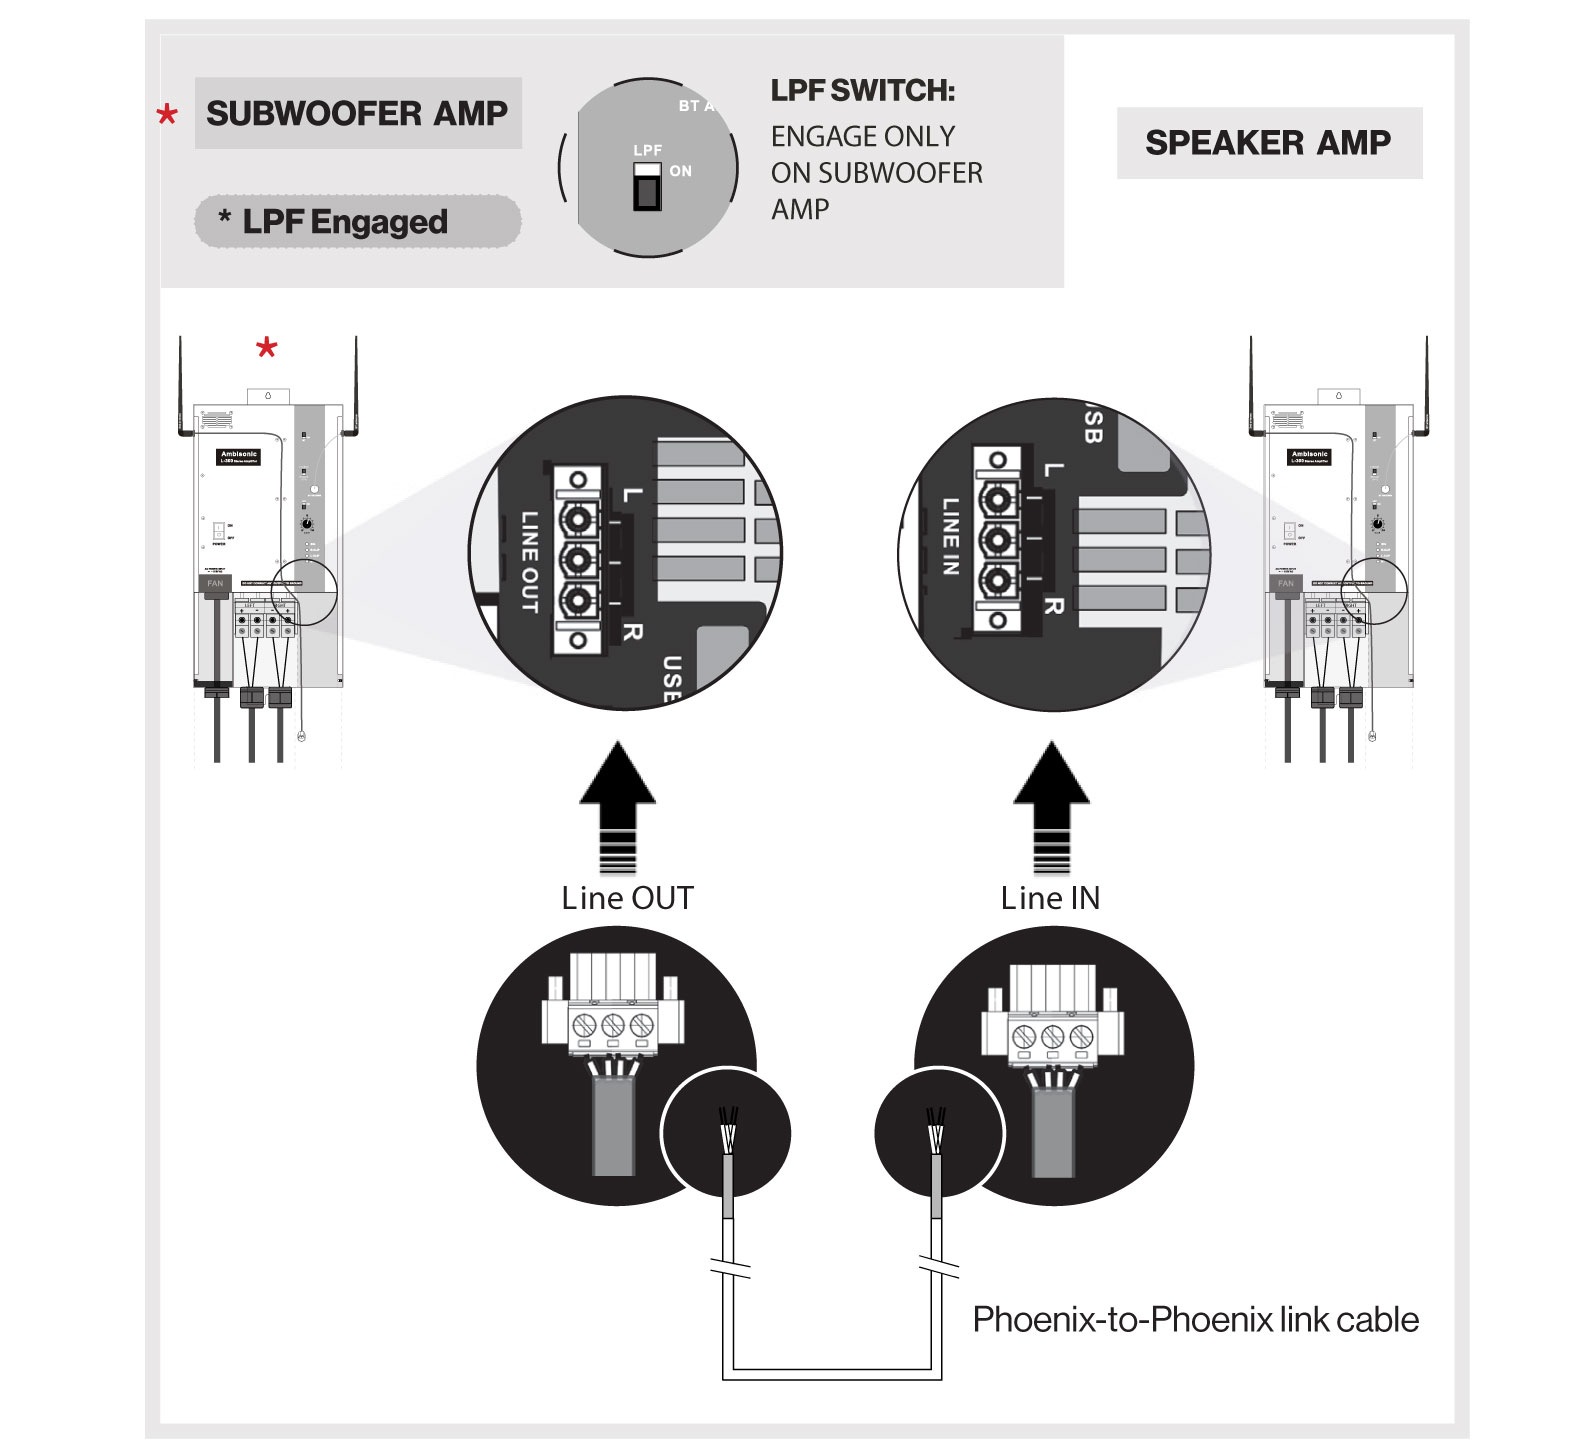
Use a 3-conductor wire to make a Phoenix-to-Phoenix Link cable to connect two L-300 Amplifiers. Polarity is critical. L to L, R to R, and Center to Center is common. Phoenix connectors are included.
Note: The volume adjustment on the second amp will only go as high as the volume on the first amp. You may want to line out of the subwoofer amp to line in on the speaker amp. This will enable you to reduce power to the speakers for a perceived greater bass presence.
DIAGRAM 9 • LSKIT 4 | Linking Amplifiers
LS KIT 3 | L-300 AMPLIFIER CALIBRATION
Once the LS KIT 3 is wired up, follow these Calibration Steps:
Ensure the two L-300 Amplifiers are linked, using the supplied 3 terminal Phoenix connectors, connecting the “Line Out” of the Subwoofer Amp to the “Line In” on the Speaker Amp. See Diagram 9.
Ensure a 3-conductor wire is used between Phoenix connectors.
Δ DO NOT ENGAGE BRIDGE MODE FOR ANY OF THE KITS
Δ ONLY ENGAGE “LPF” ON THE SUBWOOFER AMP IN KIT 4
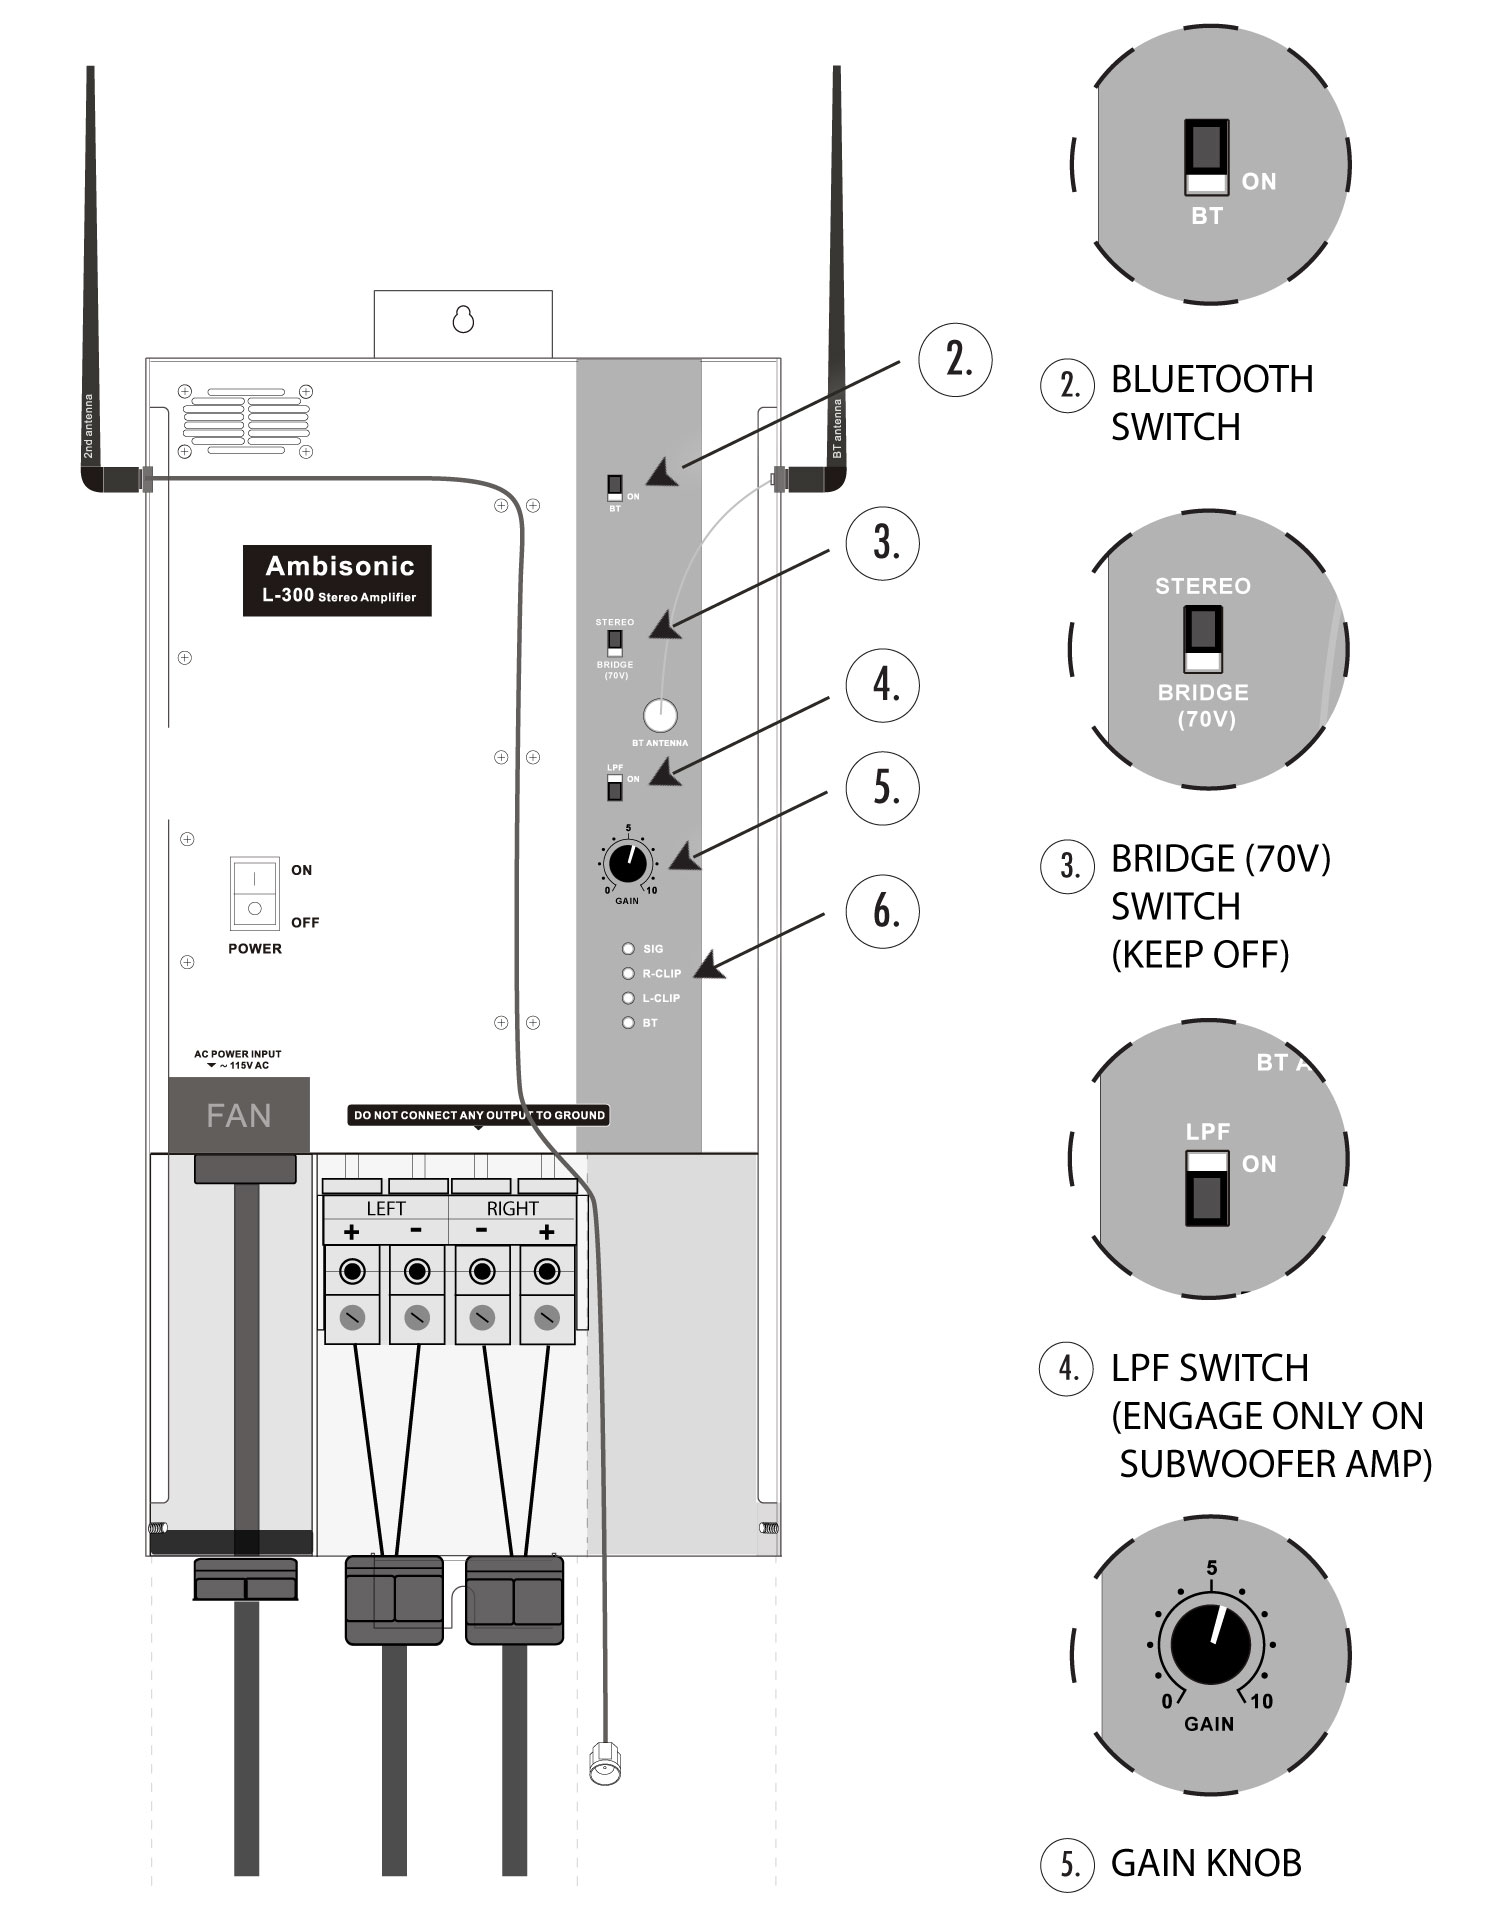
I. On both L300 Amplifiers, turn the “GAIN’’ Knob Counter Clockwise, all the way down to the left, towards the number 0.
II. Connect your Bluetooth source device and turn its volume all the way up. Play some music.
III. Slowly turn the “GAIN’’ Knob on the FIRST L300 Amp Clockwise, to the right, toward the number 10. As soon as you see the “CLIPPING” lights start to flicker red, turn the knob back to the left slightly, so the clipping lights do not show. This is the ideal position & should be left as is.
IV. Slowly turn the “GAIN’’ Knob on the SECOND L300 Amp Clockwise, to the right, toward the number 10. As soon as you see the “CLIPPING” lights start to flicker red, turn the knob back to the left slightly, so the clipping lights do not show. This is the ideal position & should be left as is.
V. After following these calibration steps, ONLY the source device should be used to control volume during future use.
VI. Ensure the “LPF” SWITCH is ENGAGED on the Subwoofer Amp.
DIAGRAM 10 • L-300 Amplifier Set Up for LS KIT4
2. Bluetooth Switch
3. Bridge (70V) or Stereo Switch
4. Low Pass Filter (LPF) Switch
5. Gain Knob
6. Clipping/BT Indicator Lights
——————————————-
12. Line OUT Phoenix Connection
13. Line IN Phoenix Connection
14. USB 5V Power Port to Streamer
Ls Kit 3 Wiring Diagram | Approx. 3,000 Sqft Coverage
Ls Kit 4 Wiring Diagram | Approx. 3,500 Sqft Coverage
Testing The System
Get the system playing, then go up close to each of the satellite speakers and the subwoofer to make sure all of them are working.
If any one speaker is not working, check the connection for that speaker. If multiple speakers are not working, start by checking the connection for the disconnected speaker that’s closest to the subwoofer, then check the other connections down the line until you get all the satellites working.
Play a tune with vocals.
Stand equidistant from the first left/right pair of satellite speakers. The vocals should mostly seem to coming from a point between the left and right speakers. If the vocals sound spacey, like they’re coming from all around, check the positive and negative polarity connections for that pair of speakers. Repeat with all the other left/right pairs.
Once you’re confident that the system is working correctly, go ahead and bury the wires.
When the wires are buried, check the system once again to make sure all the speakers and the subwoofer are connected and working.
Connecting To A Bluetooth
Once all connections are complete, turn the system on. Make sure the BT switch is turned on. On a smartphone, go to “Settings” and select “Bluetooth” and turn it on. Look for and select the device name, which will match the device serial number (found on the label located on the inside of the amp door). Once connected, open and play your favorite tunes from the phone.
Troubleshooting
No sound from all speakers:
Make sure the amplifier and source device (bluetooth, music streamer, multi-room controller, etc.) are turned on, music is playing, and the volume is turned up.
Check the connections between the source device and the L-300 to make sure they are firmly connected and that the cables are in good condition.
Check the connections on the speaker cables between the L-300 and the subwoofer to make sure they are securely connected.
No sound from one speaker:
Dig down to find the cable connection to that speaker and check the connection to make sure it’s secure. If the connection seems good, try connecting a spare speaker to see if it works. If the spare speaker works but the Landscape speaker doesn’t, contact Ambisonic.
No sound from all the right-channel or all the left-channel speakers:
Check to make sure the source device is connected to the input of the L-300. Check the connections on the speaker cable for that channel going from the L300 to the subwoofer, and the connection going from the L-300 to the first satellite speaker for that channel.
Bass is weak:
Check the polarity of the speaker cables going from the L-300 to the subwoofer, and make sure positive is connected to positive and negative to negative on both ends of both cables.
Technical Assistance
If you have any questions or concerns about installing or using this product, you can reach us through one of the following methods:
Phone: (844) 674-4461
Hours of operation: 8:00am – 5:00pm (Pacific Time), Mon – Fri
Email: sales@originacoustics.com
If you are having technical trouble, please include the model number and briefly explain what steps you took to resolve the problem in your email, or be prepared to answer these questions over the phone. If you are considering returning the product, it’s required that you contact Origin Acoustics prior to any return attempts. This way we can determine if the issue can be resolved without returning the product, or if needed we can provide instructions and support for the return process.
Specifications
LS64 Satellite Speakers:
• 6” Polypropylene Woofer
• 6” Passive Radiator
• 1” Titanium Tweeter
• Frequency Response: 60Hz – 20kHz [+/-3dB]
• Power Handling: 50W x RMS | 150W Peak
• Impedance: 8 Ω or 70 V
• SPL: 106 dB
• Weather & UV Resistant ABS Enclosure/
Rugged Injected Molded Polypropylene
• Dimensions: 11” L x 7” H x 7.1” Diameter
• LSLS Ground Spike: 11”
S11BP-IG Subwoofer:
• In-Ground Subwoofer
• 11” Dual Voice-Coil Polypropylene Woofer
• 2” Voice Coil
• Frequency Response: 41Hz – 150Hz [+/-3dB]
• Power Handling: 200W x 2 AES | 400W x 2 Peak
• Impedance: 8 Ω or 70 V
• Low Density Polyethylene (LDPE) Black Sealed Enclosure
• Dimensions: 12 3/16’’ Diameter x 23” H Base
17” Diameter x 8 7/16” H Canopy
L-300 Digital 2-Channel Outdoor Amplifier:
• 2 Channels: 150W @ 8Ω / 250W @ 4Ω
• Surface Mounting
• Bluetooth Connectivity
• All Weather Finish IP66
• 7” W x 6.25” D x 12.75” H
• 120Hz LPF Switch as Subwoofer Amp
• Input Sensitivity
